1. create_electric_flow_background
発光するストリングとゴースト処理を組み合わせることで、光や波、電気のようなエフェクトを表現できます。Compositingの設定では、Compositing nodesでエフェクト→グレア→ミックスとノードをつなぎ、カラーバランスの色を調整します。一度レンダリングしておくと、Compositingで結果を見ながらパラメータを調整できます。そのほか、マテリアルのサーフェス(放射)の強さを上げたり(5程度)、被写体とカメラの距離を変えたりすると、光の広がり方が変わります。
画像ファイルを背景に設定する方法
画像ファイルを背景に設定するには、次の手順で平面に画像を貼り付けます。
- 適当な平面を追加して選択します
- Shadingタブを開きます
- 画面下部の中央あたりにある「新規」ボタンをクリックします
- プリンシプルBSDFが自動で生成されるので、Xキーで削除します
- 追加したい画像をドラッグアンドドロップします
- 画像ノードとマテリアル出力ノードをつなぎ、テクスチャに反映させます
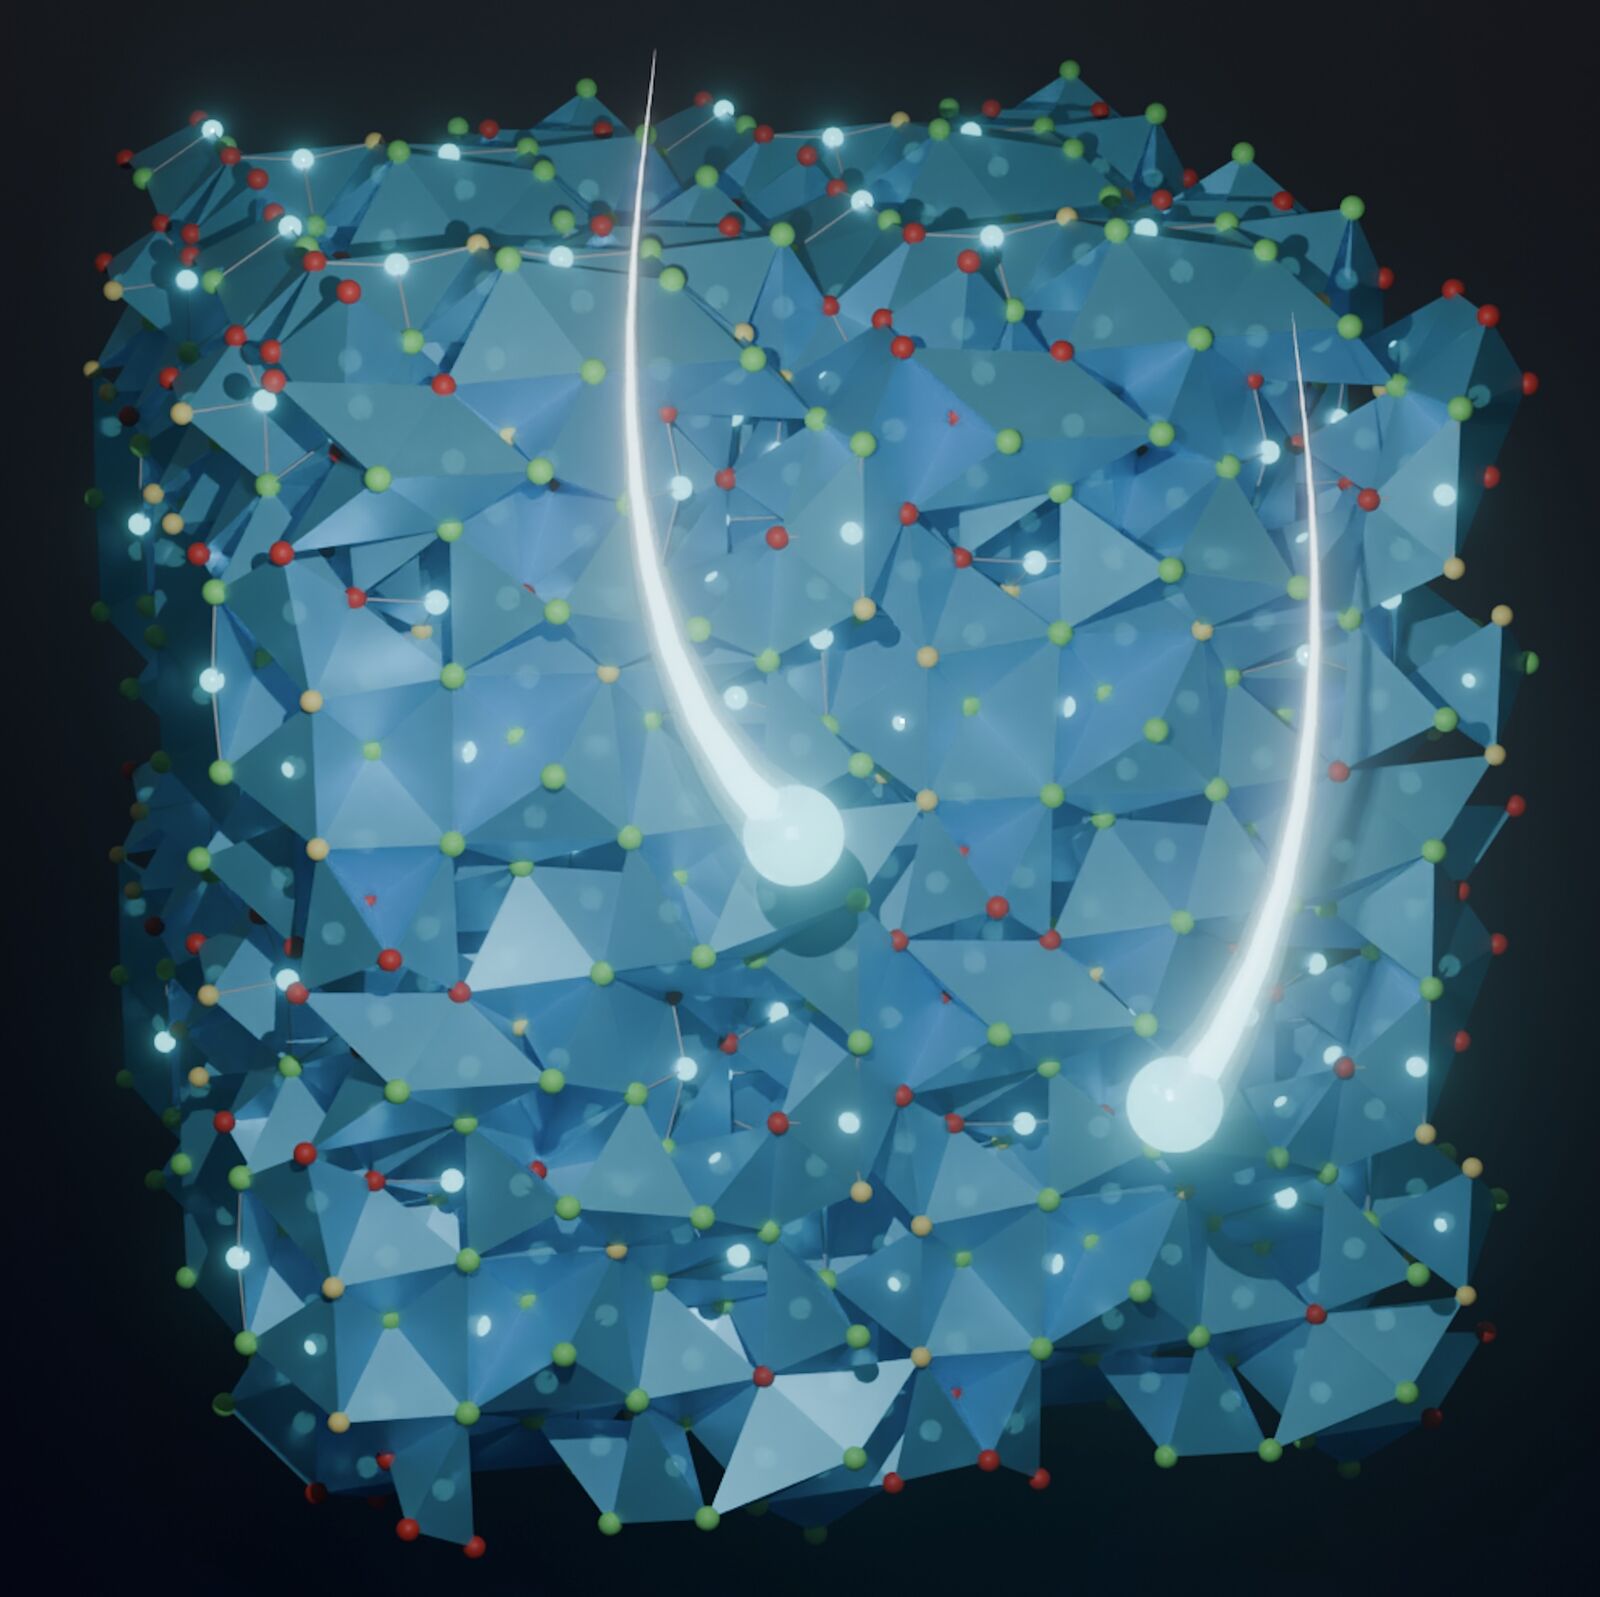
結晶構造描画 + 背景用平面に画像を反映
2. 背景用3Dマインクラフト風地形
正規分布データの生成や、クラスタリングにおけるデータ分布のイメージ図として使えるコードです。Blender 4.5で動作します(4.2では未検証です)。最後にカラーランプの範囲や色、マテリアルの色などを調整すると、さらに良い仕上がりになります。
コードを表示(python、318行)
import bpy
import bmesh
import numpy as np
from mathutils import Vector, noise
import random
from math import exp, pi, sqrt

def clear_scene():
    """シーンをクリア"""
    bpy.ops.object.select_all(action='SELECT')
    bpy.ops.object.delete(use_global=False)

    # マテリアルもクリア
    for material in bpy.data.materials:
        bpy.data.materials.remove(material)

def gaussian_2d(x, y, center_x, center_y, sigma_x, sigma_y, amplitude):
    """2D正規分布関数"""
    exponent = -((x - center_x)**2 / (2 * sigma_x**2) + (y - center_y)**2 / (2 * sigma_y**2))
    return amplitude * exp(exponent)

def perlin_noise_2d(x, y, scale=1.0, octaves=4, persistence=0.5, lacunarity=2.0):
    """パーリンノイズ関数 - シンプルバージョン"""
    value = 0.0
    amplitude = 1.0
    frequency = scale

    for i in range(octaves):
        vec = Vector((x * frequency, y * frequency, 0))
        value += noise.noise(vec) * amplitude
        amplitude *= persistence
        frequency *= lacunarity

    return value

def composite_height_function(x, y, size_x, size_y, gaussian_params, noise_params):
    """複合高さ関数: 複数の正規分布とノイズを合成"""
    height = 0.0

    norm_height = len(gaussian_params)
    # 複数の正規分布を加算(正規化)
    for params in gaussian_params:
        height += gaussian_2d(x, y,
                             params['center_x'],
                             params['center_y'],
                             params['sigma_x'],
                             params['sigma_y'],
                             params['amplitude'])/norm_height

    # ノイズを追加
    noise_value = perlin_noise_2d(x, y,
                                  noise_params['scale'],
                                  noise_params['octaves'],
                                  noise_params['persistence'],
                                  noise_params['lacunarity'])
    height += noise_value * noise_params['amplitude']

    return height

def create_voxel_terrain(size_x=10, size_y=10, subdivisions=50,
                         num_gaussians=3, noise_strength=0.5, max_height=2.0,
                         base_height=0.1):
    """ボクセル地形メッシュを作成(各グリッドが独立した四角柱)"""

    # ランダムな正規分布パラメータを生成
    gaussian_params = []
    for i in range(num_gaussians):
        temp_random = random.uniform(0, 1)
        if temp_random > 0.9:
            # 尖った山
            gaussian_params.append({
                'center_x': random.uniform(-size_x/2, size_x/2),
                'center_y': random.uniform(-size_y/2, size_y/2),
                'sigma_x': random.uniform(size_x/30, size_x/20),
                'sigma_y': random.uniform(size_y/30, size_y/20),
                'amplitude': random.uniform(0.5, 3) * max_height
            })
        elif temp_random > 0.4:
            # 中程度の山
            gaussian_params.append({
                'center_x': random.uniform(-size_x/2, size_x/2),
                'center_y': random.uniform(-size_y/2, size_y/2),
                'sigma_x': random.uniform(size_x/30, size_x/20),
                'sigma_y': random.uniform(size_y/30, size_y/20),
                'amplitude': random.uniform(0.3, 0.5) * max_height
            })
        else:
            # なだらかな丘
            gaussian_params.append({
                'center_x': random.uniform(-size_x/2, size_x/2),
                'center_y': random.uniform(-size_y/2, size_y/2),
                'sigma_x': random.uniform(size_x/8, size_x/4),
                'sigma_y': random.uniform(size_y/8, size_y/4),
                'amplitude': random.uniform(0.3, 0.7) * max_height
            })

    # ノイズパラメータ
    noise_params = {
        'scale': 0.5,
        'octaves': 4,
        'persistence': 0.5,
        'lacunarity': 2.0,
        'amplitude': noise_strength * max_height
    }

    # メッシュを作成
    mesh = bpy.data.meshes.new(name="VoxelTerrain")
    obj = bpy.data.objects.new("VoxelTerrain", mesh)
    bpy.context.collection.objects.link(obj)

    # BMeshを使用してメッシュを構築
    bm = bmesh.new()

    # グリッドのサイズを計算
    step_x = size_x / subdivisions
    step_y = size_y / subdivisions

    # 高さ値を格納するリスト
    height_values = []

    # 各グリッドセルに対して四角柱を作成
    for j in range(subdivisions):
        for i in range(subdivisions):
            # セルの中心座標を計算
            center_x = -size_x/2 + (i + 0.5) * step_x
            center_y = -size_y/2 + (j + 0.5) * step_y

            # 高さを計算
            height = composite_height_function(center_x, center_y, size_x, size_y,
                                             gaussian_params, noise_params)
            # 最小高さを確保
            height = max(base_height, height)
            height_values.append(height)

            # 四角柱の8つの頂点を作成
            # 底面の4頂点
            x1 = -size_x/2 + i * step_x
            x2 = -size_x/2 + (i + 1) * step_x
            y1 = -size_y/2 + j * step_y
            y2 = -size_y/2 + (j + 1) * step_y

            v0 = bm.verts.new((x1, y1, 0))      # 底面左下
            v1 = bm.verts.new((x2, y1, 0))      # 底面右下
            v2 = bm.verts.new((x2, y2, 0))      # 底面右上
            v3 = bm.verts.new((x1, y2, 0))      # 底面左上

            # 上面の4頂点
            v4 = bm.verts.new((x1, y1, height))  # 上面左下
            v5 = bm.verts.new((x2, y1, height))  # 上面右下
            v6 = bm.verts.new((x2, y2, height))  # 上面右上
            v7 = bm.verts.new((x1, y2, height))  # 上面左上

            # 面を作成(6面)
            bm.faces.new([v0, v1, v2, v3])  # 底面
            bm.faces.new([v4, v7, v6, v5])  # 上面
            bm.faces.new([v0, v4, v5, v1])  # 前面
            bm.faces.new([v2, v6, v7, v3])  # 後面
            bm.faces.new([v0, v3, v7, v4])  # 左面
            bm.faces.new([v1, v5, v6, v2])  # 右面

    # メッシュを更新
    bm.to_mesh(mesh)
    bm.free()

    # オブジェクトをアクティブに設定
    bpy.context.view_layer.objects.active = obj
    obj.select_set(True)

    # フラットシェーディングを適用(カクカクした見た目にする)
    bpy.ops.object.shade_flat()

    return obj, height_values

def create_height_material():
    """高さに基づく色付けマテリアルを作成"""
    mat = bpy.data.materials.new(name="HeightGradient")
    mat.use_nodes = True
    # ブレンドモードと透明度の設定
    mat.blend_method = 'BLEND'
    mat.use_backface_culling = False

    nodes = mat.node_tree.nodes
    links = mat.node_tree.links

    # 既存のノードをクリア
    nodes.clear()

    # ノードを追加
    output_node = nodes.new(type='ShaderNodeOutputMaterial')
    principled_node = nodes.new(type='ShaderNodeBsdfPrincipled')
    color_ramp_node = nodes.new(type='ShaderNodeValToRGB')
    map_range_node = nodes.new(type='ShaderNodeMapRange')
    separate_xyz_node = nodes.new(type='ShaderNodeSeparateXYZ')
    geometry_node = nodes.new(type='ShaderNodeNewGeometry')

    # ノードの位置を設定
    output_node.location = (600, 0)
    principled_node.location = (400, 0)
    color_ramp_node.location = (200, 0)
    map_range_node.location = (0, 0)
    separate_xyz_node.location = (-200, 0)
    geometry_node.location = (-400, 0)

    # Map Rangeノードの設定(0-50を0-1にマッピング)
    map_range_node.inputs['From Min'].default_value = 0.0
    map_range_node.inputs['From Max'].default_value = 50.0
    map_range_node.inputs['To Min'].default_value = 0.0
    map_range_node.inputs['To Max'].default_value = 1.0
    map_range_node.clamp = True  # 範囲外の値をクランプ

    # カラーランプの設定(ボクセル地形用の鮮やかな色)
    color_ramp = color_ramp_node.color_ramp
    color_ramp.interpolation = 'LINEAR'  # 線形グラデーション

    color_ramp.elements[0].position = 0.2
    color_ramp.elements[0].color = (0.9, 0.53, 0.43, 1.0)

    # 中間色を追加
    color_ramp.elements.new(0.35)
    color_ramp.elements[1].color = (0.07, 0.68, 0.75, 1.0)

    color_ramp.elements.new(0.55)
    color_ramp.elements[2].color = (0, 0.71, 1, 1.0)

    # ノードを接続
    links.new(geometry_node.outputs['Position'], separate_xyz_node.inputs['Vector'])
    links.new(separate_xyz_node.outputs['Z'], map_range_node.inputs['Value'])
    links.new(map_range_node.outputs['Result'], color_ramp_node.inputs['Fac'])
    links.new(color_ramp_node.outputs['Color'], principled_node.inputs['Base Color'])
    links.new(principled_node.outputs['BSDF'], output_node.inputs['Surface'])

    # マテリアルプロパティを設定
    principled_node.inputs['Roughness'].default_value = 0.9
    principled_node.inputs['Specular IOR Level'].default_value = 0.2
    principled_node.inputs['Alpha'].default_value = 0.3  # アルファを0.3に設定

    return mat

def setup_camera_and_lighting():
    """カメラとライティングのセットアップ"""
    # カメラを追加
    camera_data = bpy.data.cameras.new(name='Camera')
    camera_object = bpy.data.objects.new('Camera', camera_data)
    bpy.context.collection.objects.link(camera_object)
    camera_object.location = (20, -20, 15)
    camera_object.rotation_euler = (1.1, 0, 0.785)
    bpy.context.scene.camera = camera_object

    # サンライトを追加
    light_data = bpy.data.lights.new(name='Sun', type='SUN')
    light_data.energy = 2
    light_object = bpy.data.objects.new('Sun', light_data)
    bpy.context.collection.objects.link(light_object)
    light_object.location = (5, 5, 10)
    light_object.rotation_euler = (0.6, 0.2, 0)

    # 環境光を追加(ワールド設定)
    world = bpy.context.scene.world
    world.use_nodes = True
    bg_node = world.node_tree.nodes['Background']
    bg_node.inputs['Color'].default_value = (0.7, 0.8, 0.9, 1.0)
    bg_node.inputs['Strength'].default_value = 0.5

def generate_voxel_terrain(size_x=20, size_y=20, subdivisions=50,
                          num_gaussians=5, noise_strength=0.3, max_height=3.0, base_height=0.1):
    """メイン関数: ボクセル地形を生成"""

    # シーンをクリア
    clear_scene()

    # ボクセル地形メッシュを作成
    terrain_obj, height_values = create_voxel_terrain(
        size_x=size_x,
        size_y=size_y,
        subdivisions=subdivisions,
        num_gaussians=num_gaussians,
        noise_strength=noise_strength,
        max_height=max_height,
        base_height=0.1  # 最小高さ
    )

    # マテリアルを作成して適用
    material = create_height_material()
    terrain_obj.data.materials.append(material)

    # カメラとライティングをセットアップ
    setup_camera_and_lighting()

    # ビューポートシェーディングをマテリアルプレビューに設定
    for area in bpy.context.screen.areas:
        if area.type == 'VIEW_3D':
            for space in area.spaces:
                if space.type == 'VIEW_3D':
                    space.shading.type = 'MATERIAL'

    print(f"ボクセル地形生成完了:")
    print(f"  サイズ: {size_x} x {size_y}")
    print(f"  グリッド数: {subdivisions} x {subdivisions}")
    print(f"  総ボクセル数: {subdivisions * subdivisions}")
    print(f"  正規分布の数: {num_gaussians}")
    print(f"  ノイズ強度: {noise_strength}")
    print(f"  最大高さ設定: {max_height}")
    if height_values:
        print(f"  実際の最小高さ: {min(height_values):.2f}")
        print(f"  実際の最大高さ: {max(height_values):.2f}")

# スクリプトを実行
if __name__ == "__main__":
    # パラメータを調整して実行
    generate_voxel_terrain(
        size_x=50,           # X方向のサイズ
        size_y=50,           # Y方向のサイズ
        subdivisions=100,    # グリッド分割数(100x100のボクセル)
        num_gaussians=50,    # 正規分布の数
        noise_strength=0.003,  # ノイズの強度
        max_height=400.0,    # 最大高さ
        base_height=5        # 最小高さ
    )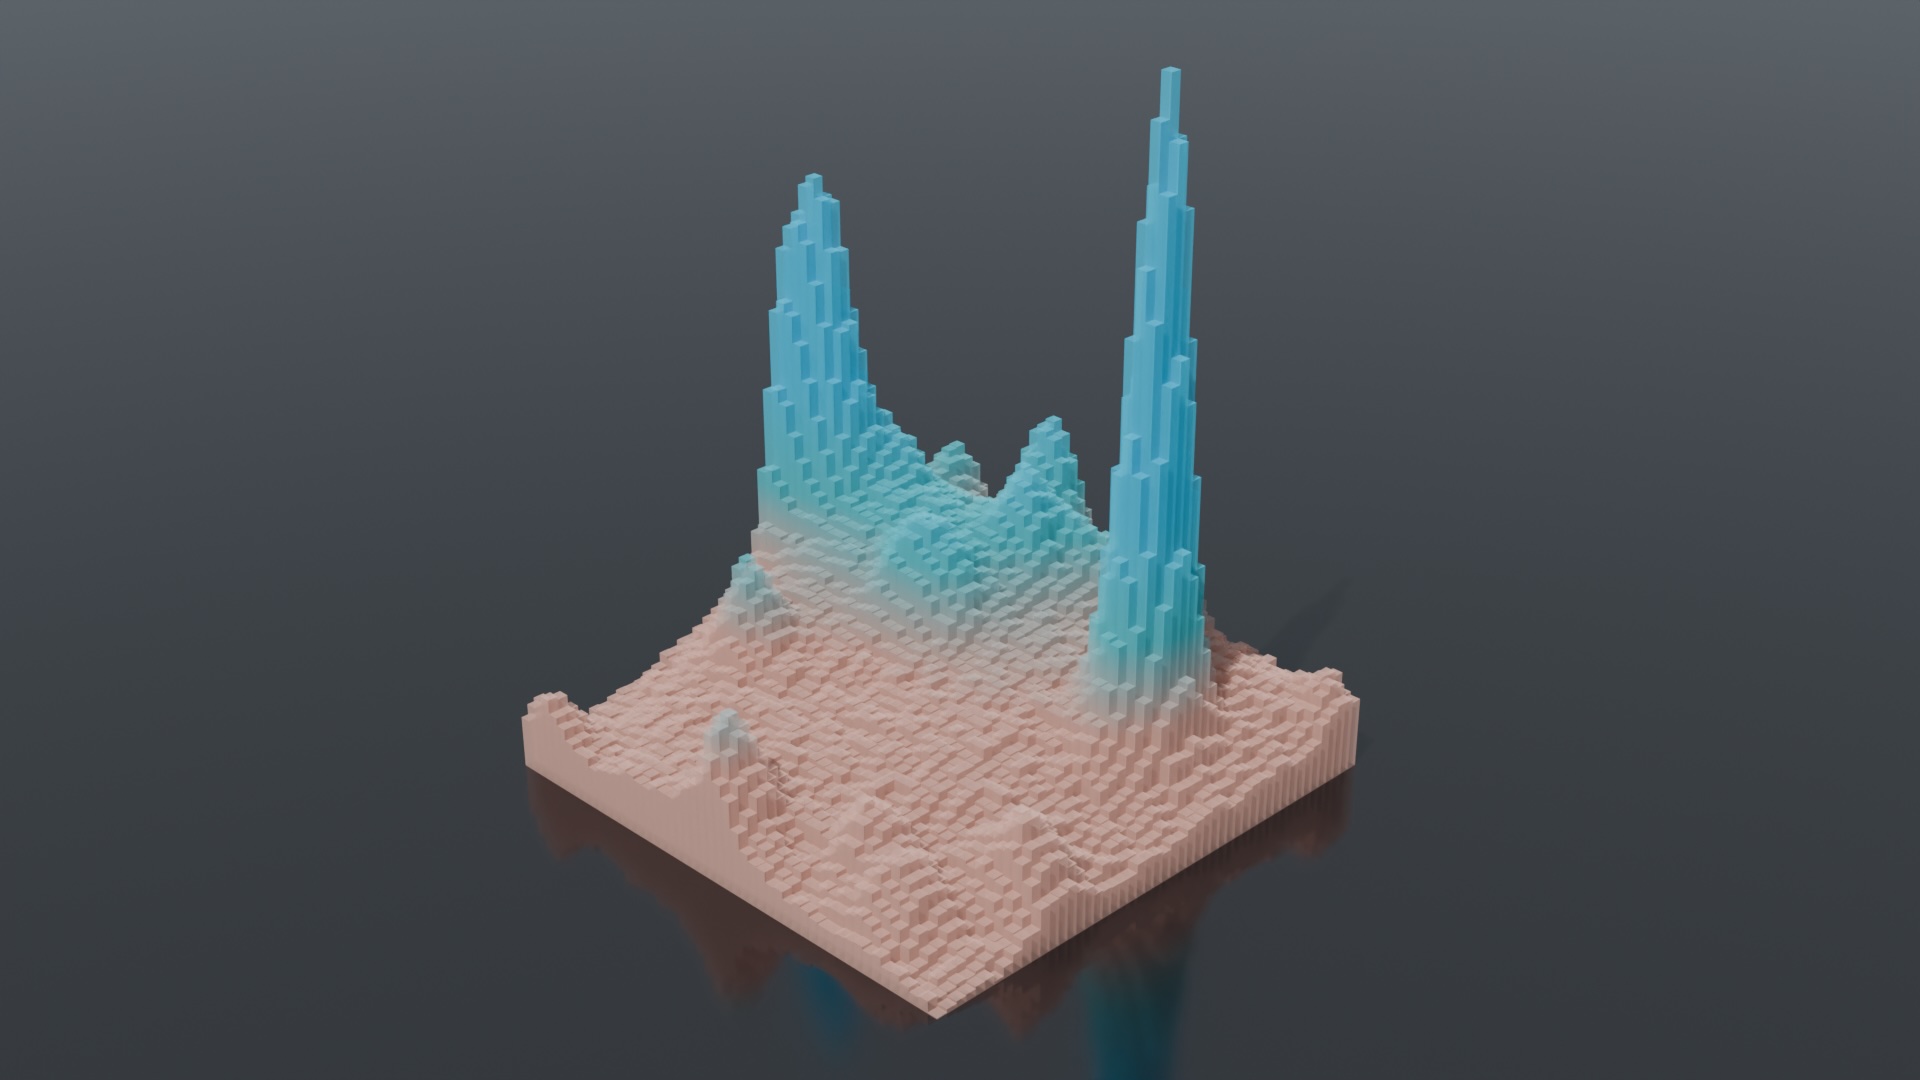
terrain
3. 背景用の雷
色々なパターンの雷を作成できるコードです。
コードを表示(python、527行)
import bpy
import math
import random
from mathutils import Vector
import bmesh

# シーンをクリア
def clear_scene():
    """既存のメッシュオブジェクトを削除"""
    bpy.ops.object.select_all(action='SELECT')
    bpy.ops.object.delete(use_global=False)

# 雷用の発光マテリアルを作成
def create_lightning_material(name="LightningMat", color=(0.7, 0.8, 1.0), strength=30.0):
    """雷用の発光マテリアルを作成"""
    mat = bpy.data.materials.new(name=name)
    mat.use_nodes = True
    nodes = mat.node_tree.nodes
    nodes.clear()

    # Emission シェーダー
    emission = nodes.new(type='ShaderNodeEmission')
    emission.inputs['Color'].default_value = (*color, 1.0)
    emission.inputs['Strength'].default_value = strength

    # ノイズテクスチャを追加(色の変化)
    noise = nodes.new(type='ShaderNodeTexNoise')
    noise.inputs['Scale'].default_value = 50.0

    # ColorRamp(コントラスト調整)
    ramp = nodes.new(type='ShaderNodeValToRGB')
    ramp.color_ramp.elements[0].position = 0.3
    ramp.color_ramp.elements[0].color = (color[0]*0.8, color[1]*0.8, color[2]*0.8, 1.0)
    ramp.color_ramp.elements[1].position = 0.7
    ramp.color_ramp.elements[1].color = (*color, 1.0)

    # 出力
    output = nodes.new(type='ShaderNodeOutputMaterial')

    # ノード接続
    links = mat.node_tree.links
    links.new(noise.outputs['Fac'], ramp.inputs['Fac'])
    links.new(ramp.outputs['Color'], emission.inputs['Color'])
    links.new(emission.outputs[0], output.inputs[0])

    return mat

# 太さのグラデーションを計算
def calculate_thickness_gradient(t, thick_gradation, thick_gradation_frac):
    """
    位置tにおける太さの係数を計算
    t: 0.0~1.0の位置
    thick_gradation: "none", "start", "intermediate"
    thick_gradation_frac: グラデーションの最小太さ比率
    """
    if thick_gradation == "none":
        return 1.0
    elif thick_gradation == "start":
        # 始点が最も太く、終点に向かって細くなる
        return 1.0 - (1.0 - thick_gradation_frac) * t
    elif thick_gradation == "intermediate":
        # 中間が最も太い
        if t <= 0.5:
            return thick_gradation_frac + (1.0 - thick_gradation_frac) * (t * 2)
        else:
            return thick_gradation_frac + (1.0 - thick_gradation_frac) * (2.0 - t * 2)
    else:
        return 1.0

# 単体の雷セグメントを作成
def create_lightning_segment(start, end, name, thickness, subdivisions, zigzag_intensity,
                            thick_gradation="none", thick_gradation_frac=0.3, material=None):
    """雷のセグメントを作成"""
    # カーブデータを作成
    curve_data = bpy.data.curves.new(name=name, type='CURVE')
    curve_data.dimensions = '3D'
    curve_data.fill_mode = 'FULL'
    curve_data.bevel_depth = thickness
    curve_data.bevel_resolution = 3

    # スプラインを追加(NURBSを使用して太さを制御)
    spline = curve_data.splines.new('NURBS')

    # 頂点を生成(ジグザグに)
    points = []
    for i in range(subdivisions + 1):
        t = i / subdivisions
        # 基本的な補間位置
        base_pos = start.lerp(end, t)

        # ランダムなオフセットを追加(始点と終点以外)
        if i > 0 and i < subdivisions:
            offset = Vector((
                random.uniform(-0.3, 0.3) * zigzag_intensity,
                random.uniform(-0.3, 0.3) * zigzag_intensity,
                random.uniform(-0.1, 0.1) * zigzag_intensity
            ))
            # 距離に応じてオフセットを減衰
            offset *= (1.0 - abs(t - 0.5) * 2) * 0.5
            base_pos += offset

        points.append(base_pos)

    # スプラインに頂点を設定
    spline.points.add(len(points) - 1)
    for i, point in enumerate(points):
        t = i / subdivisions if subdivisions > 0 else 0
        # 太さのグラデーションを適用
        radius = calculate_thickness_gradient(t, thick_gradation, thick_gradation_frac)
        spline.points[i].co = (*point, 1)
        spline.points[i].radius = radius

    spline.use_endpoint_u = True

    # オブジェクトを作成
    curve_obj = bpy.data.objects.new(name, curve_data)
    bpy.context.collection.objects.link(curve_obj)

    # マテリアルを適用
    if material and hasattr(curve_obj.data, 'materials'):
        curve_obj.data.materials.append(material)

    return curve_obj, points

# 再帰的に分岐を作成
def create_branches_recursive(parent_points, parent_start, parent_end, thickness, subdivisions,
                            zigzag_intensity, branches_per_level, branch_thick_ratio,
                            branch_length_range, branch_spread, current_depth, max_depth,
                            thick_gradation, thick_gradation_frac, material):
    """再帰的に分岐を作成"""
    if current_depth >= max_depth:
        return

    # 深さに応じて分岐の長さ比率を調整(再帰的に小さくなる)
    depth_factor = 0.8 ** current_depth  # 各層で0.8倍になる
    adjusted_length_range = (
        branch_length_range[0] * depth_factor,
        branch_length_range[1] * depth_factor
    )

    # 各分岐を作成
    for branch_idx in range(branches_per_level):
        # 分岐点を全体からランダムに選択
        if len(parent_points) > 2:
            branch_point_idx = random.randint(1, len(parent_points) - 2)
            branch_start = parent_points[branch_point_idx]
        else:
            branch_start = parent_points[len(parent_points) // 2]

        # メイン方向を計算
        main_direction = (parent_end - parent_start).normalized()

        # 直交ベクトルを計算(広がり用)
        if abs(main_direction.x) < 0.9:
            perp1 = main_direction.cross(Vector((1, 0, 0)))
        else:
            perp1 = main_direction.cross(Vector((0, 1, 0)))
        perp1.normalize()

        # もう一つの垂直方向
        perp2 = main_direction.cross(perp1)
        perp2.normalize()

        # ランダムな角度で広がり方向を決定
        angle = random.uniform(0, 2 * math.pi)
        spread_direction = math.cos(angle) * perp1 + math.sin(angle) * perp2

        # 分岐の終点を計算
        # 長さ(再帰的に調整された範囲を使用)
        length_factor = random.uniform(adjusted_length_range[0], adjusted_length_range[1])
        branch_length = (parent_end - parent_start).length * length_factor

        # 広がり
        spread_amount = branch_length * branch_spread * random.uniform(0.5, 1.0)

        # 最終的な終点
        branch_end = branch_start + main_direction * branch_length + spread_direction * spread_amount

        # 分岐の太さと分割数を計算
        branch_thickness = thickness * branch_thick_ratio
        branch_subdivisions = max(2, int(subdivisions * 0.7))

        # 分岐セグメントを作成(マテリアルを適用)
        branch_obj, branch_points = create_lightning_segment(
            branch_start,
            branch_end,
            f"Lightning_Branch_D{current_depth}_B{branch_idx}",
            branch_thickness,
            branch_subdivisions,
            zigzag_intensity * 0.7,
            thick_gradation,
            thick_gradation_frac,
            material  # マテリアルを渡す
        )

        # 次の深さの分岐を作成(再帰)
        if current_depth + 1 < max_depth:
            next_branches = max(1, branches_per_level - 1)  # 深くなるほど分岐数を減らす
            create_branches_recursive(
                branch_points, branch_start, branch_end,
                branch_thickness, branch_subdivisions,
                zigzag_intensity * 0.7,
                next_branches,
                branch_thick_ratio,
                branch_length_range,  # オリジナルの範囲を渡す(再帰内で調整される)
                branch_spread * 0.8,  # 深くなるほど広がりを減らす
                current_depth + 1,
                max_depth,
                thick_gradation,
                thick_gradation_frac,
                material
            )

# 単体の雷を生成(多層分岐対応)
def create_single_lightning(start_pos, end_pos, branches=3, subdivisions=8, thickness=0.02,
                          branch_thick_ratio=0.9, zigzag_intensity=1.0,
                          branch_length_range=(0.3, 0.7), branch_spread=0.5, branch_depth=1,
                          thick_gradation="none", thick_gradation_frac=0.3, material=None):
    """多層分岐を持つ単体の雷を生成"""

    # メインの雷を作成
    main_obj, main_points = create_lightning_segment(
        start_pos, end_pos,
        "Lightning_Main",
        thickness,
        subdivisions,
        zigzag_intensity,
        thick_gradation,
        thick_gradation_frac,
        material
    )

    # 分岐を再帰的に作成
    if branches > 0 and branch_depth > 0 and material:
        create_branches_recursive(
            main_points, start_pos, end_pos,
            thickness, subdivisions,
            zigzag_intensity,
            branches,
            branch_thick_ratio,
            branch_length_range,
            branch_spread,
            0,  # 現在の深さ
            branch_depth,  # 最大深さ
            thick_gradation,
            thick_gradation_frac,
            material
        )

    return main_obj

# 大量の雷を生成するメイン関数
def generate_lightning_field(
    count=20,                         # 生成する雷の総数
    area_size=10,                     # 雷を配置するエリアのXY範囲(-area_sizeから+area_sizeまで)
    height_range=(5, 15),             # 雷の開始高さの範囲(最小値, 最大値)
    lightning_type="simple",          # 雷のタイプ:"simple"(分岐なし)または"branched"(分岐あり)
    direction="random",               # 雷の方向:"directional"(下向き)、"random"(完全ランダム)、
                                     #          "sphere"(球状に反転)、"random_center"(中心から放射)
    color="random",                   # 雷の色:"random"または特定色("blue_white", "white", "blue",
                                     #         "cyan", "light_green", "light_blue", "purple")
    strength=30.0,                    # 発光マテリアルの強度(Emissionの強さ)
    thickness_range=(0.02, 0.03),     # 雷の太さの範囲(最小値, 最大値)
    branch_thick_ratio=0.9,           # 分岐の太さ比率(0.0~1.0、メインに対する分岐の太さ)
    zigzag_intensity=1.0,             # ジグザグの強度(0.0で直線、大きいほど激しい)
    subdivisions=8,                   # 雷の分割数(多いほど詳細だが重い)
    branches=3,                       # 第1層の分岐数(branchedタイプの場合のみ有効)
    branch_length_range=(0.3, 0.7),   # 分岐の長さ比率の範囲(親に対する比率)
    branch_spread=0.5,                # 分岐の広がり度(0.0で平行、1.0で大きく広がる)
    branch_depth=1,                   # 分岐の深さ(0:分岐なし、1:1層、2:2層...)
    thick_gradation="none",           # 太さのグラデーション:"none"(一定)、"start"(始点が太い)、
                                     #                    "intermediate"(中間が太い)
    thick_gradation_frac=0.3          # グラデーションの最小太さ比率(0.0~1.0)
):
    """
    大量の雷を生成するメイン関数

    詳細な引数説明:
    ================

    基本パラメータ:
    ---------------
    count: int
        生成する雷の総数。多いほど密度が高くなるが処理も重くなる

    area_size: float
        雷を配置する正方形エリアのサイズ。XY平面で-area_sizeから+area_sizeの範囲

    height_range: tuple(float, float)
        雷の開始点のZ座標(高さ)の範囲。(最小高さ, 最大高さ)

    lightning_type: str
        - "simple": シンプルな雷(分岐なし)
        - "branched": 分岐を持つ複雑な雷

    方向制御:
    ---------
    direction: str
        - "directional": 主に下向きの雷(自然な雷)
        - "random": 開始点と終了点が完全にランダム
        - "sphere": 中心点を通って球状に反対側へ
        - "random_center": 中心から放射状に広がる

    外観パラメータ:
    --------------
    color: str
        - "random": 全色からランダムに選択
        - "blue_white": 青白い雷(最も一般的)
        - "white": 純白の雷
        - "blue": 青い雷
        - "cyan": シアン色の雷
        - "light_green": 薄緑の雷
        - "light_blue": 薄青の雷
        - "purple": 紫の雷

    strength: float
        発光の強度。10~100程度が一般的。大きいほど明るい

    thickness_range: tuple(float, float)
        雷の太さの範囲。(最小太さ, 最大太さ)。0.01~0.05が一般的

    形状パラメータ:
    --------------
    zigzag_intensity: float
        ジグザグの激しさ。0.0で直線、1.0で標準、2.0以上で激しい

    subdivisions: int
        雷の分割数。多いほど細かいジグザグになるが処理が重い

    分岐パラメータ(branchedタイプのみ):
    -----------------------------------
    branches: int
        第1層の分岐数。2~5が自然

    branch_thick_ratio: float
        分岐の太さ比率。0.5~0.9が自然

    branch_length_range: tuple(float, float)
        分岐の長さ比率の範囲。親の長さに対する比率

    branch_spread: float
        分岐の広がり度。0.0で平行、0.5で適度、1.0で大きく広がる

    branch_depth: int
        分岐の深さ(層数)。0で分岐なし、1で1層、2以上で多層分岐

    太さグラデーション:
    ------------------
    thick_gradation: str
        - "none": 太さ一定
        - "start": 始点が最も太く、終点に向かって細くなる
        - "intermediate": 中間が最も太い

    thick_gradation_frac: float
        グラデーションの最小太さ比率。0.1~0.5が一般的
    """

    # カラーパレット定義
    color_palette = {
        "blue_white": (0.7, 0.8, 1.0),
        "white": (1.0, 1.0, 1.0),
        "blue": (0.3, 0.5, 1.0),
        "cyan": (0.0, 0.9, 1.0),
        "light_green": (0.6, 1.0, 0.7),
        "light_blue": (0.6, 0.9, 1.0),
        "purple": (0.8, 0.5, 1.0)
    }

    # マテリアルを作成
    if color == "random":
        materials = []
        for name, col in color_palette.items():
            mat = create_lightning_material(
                name=f"LightningMat_{name}",
                color=col,
                strength=strength
            )
            materials.append(mat)
    else:
        selected_color = color_palette.get(color, (1.0, 1.0, 1.0))
        material = create_lightning_material(
            name=f"LightningMat_{color}",
            color=selected_color,
            strength=strength
        )
        materials = [material]

    # 重心を計算
    center = Vector((0, 0, (height_range[0] + height_range[1]) / 2))

    # 雷を生成
    for i in range(count):
        # 開始位置
        start_x = random.uniform(-area_size, area_size)
        start_y = random.uniform(-area_size, area_size)
        start_z = random.uniform(height_range[0], height_range[1])
        start_pos = Vector((start_x, start_y, start_z))

        # 終了位置を方向に応じて計算
        if direction == "directional":
            # 一方向(下向き+少しのランダム性)
            end_x = start_x + random.uniform(-3, 3)
            end_y = start_y + random.uniform(-3, 3)
            end_z = random.uniform(0, height_range[0] * 0.5)

        elif direction == "random":
            # 完全ランダム
            end_x = random.uniform(-area_size, area_size)
            end_y = random.uniform(-area_size, area_size)
            end_z = random.uniform(0, height_range[1])

        elif direction == "sphere":
            # 球状(重心を通して反対側へ)
            end_pos_temp = 2 * center - start_pos
            # 少しランダム性を追加
            end_x = end_pos_temp.x + random.uniform(-1, 1)
            end_y = end_pos_temp.y + random.uniform(-1, 1)
            end_z = max(0, end_pos_temp.z + random.uniform(-2, 2))

        else:  # random_center
            # 重心から放射状に
            to_center = center - start_pos
            # 反転(重心と反対方向へ)
            direction_vec = -to_center.normalized()
            # ランダムな長さ
            length = random.uniform(3, 8)
            end_pos_temp = start_pos + direction_vec * length
            # 少しランダム性を追加
            end_x = end_pos_temp.x + random.uniform(-1, 1)
            end_y = end_pos_temp.y + random.uniform(-1, 1)
            end_z = max(0, end_pos_temp.z + random.uniform(-2, 2))

        end_pos = Vector((end_x, end_y, end_z))

        # 太さをランダムに選択
        thickness = random.uniform(thickness_range[0], thickness_range[1])

        # マテリアルを選択
        mat = random.choice(materials) if color == "random" else materials[0]

        # 雷のタイプに応じて生成
        if lightning_type == "simple":
            obj = create_single_lightning(
                start_pos, end_pos,
                branches=0,
                subdivisions=subdivisions,
                thickness=thickness,
                branch_thick_ratio=branch_thick_ratio,
                zigzag_intensity=zigzag_intensity,
                branch_length_range=branch_length_range,
                branch_spread=branch_spread,
                branch_depth=0,
                thick_gradation=thick_gradation,
                thick_gradation_frac=thick_gradation_frac,
                material=mat
            )
        elif lightning_type == "branched":
            obj = create_single_lightning(
                start_pos, end_pos,
                branches=branches,
                subdivisions=subdivisions,
                thickness=thickness,
                branch_thick_ratio=branch_thick_ratio,
                zigzag_intensity=zigzag_intensity,
                branch_length_range=branch_length_range,
                branch_spread=branch_spread,
                branch_depth=branch_depth,
                thick_gradation=thick_gradation,
                thick_gradation_frac=thick_gradation_frac,
                material=mat
            )

# カメラとワールド設定
def setup_scene_for_lightning():
    """雷用のシーン設定"""

    # カメラ設定
    if not bpy.data.objects.get("Camera"):
        bpy.ops.object.camera_add(location=(15, -15, 8))
    camera = bpy.data.objects["Camera"]
    camera.rotation_euler = (1.2, 0, 0.785)

    # ワールド設定(暗い背景)
    world = bpy.context.scene.world
    if world:
        world.use_nodes = True
        bg_node = world.node_tree.nodes.get("Background")
        if bg_node:
            bg_node.inputs[0].default_value = (0.01, 0.01, 0.02, 1.0)
            bg_node.inputs[1].default_value = 0.1

    # レンダリング設定
    bpy.context.scene.render.engine = 'CYCLES'  # または 'BLENDER_EEVEE'
    bpy.context.scene.cycles.samples = 64  # 低めのサンプル数で高速化

# ====================
# 実行コード
# ====================

# シーンをクリア
clear_scene()

# 雷フィールドを生成
generate_lightning_field(
    count=50,                          # 雷の数
    area_size=2,                     # 配置エリアのサイズ
    height_range=(8, 10),             # 高さの範囲
    lightning_type="branched",        # "simple", "branched"
    direction="random_center",        # "directional", "random", "sphere", "random_center"
    color="cyan",               # 色選択
    strength=5.0,                    # 発光の強さ
    thickness_range=(0.03, 0.04),     # 太さの範囲
    branch_thick_ratio=0.7,           # 分岐の太さ比率
    zigzag_intensity=3.0,             # ジグザグの強度
    subdivisions=20,                  # 分割数
    branches=3,                       # 第1層の分岐数
    branch_length_range=(0.4, 0.7),   # 分岐の長さ比率
    branch_spread=0.5,                # 分岐の広がり
    branch_depth=5,                   # 分岐の深さ(層数)
    thick_gradation="start",          # 太さのグラデーション
    thick_gradation_frac=0.01          # グラデーションの最小太さ比率
)

# シーン設定
setup_scene_for_lightning()

print(f"雷の生成完了! オブジェクト数: {len([o for o in bpy.data.objects if 'Lightning' in o.name])}")例1: 最もシンプルな雷です。結局のところ、これが一番使いやすいかもしれません。intermediate(中間が太くなる設定)がおすすめです。
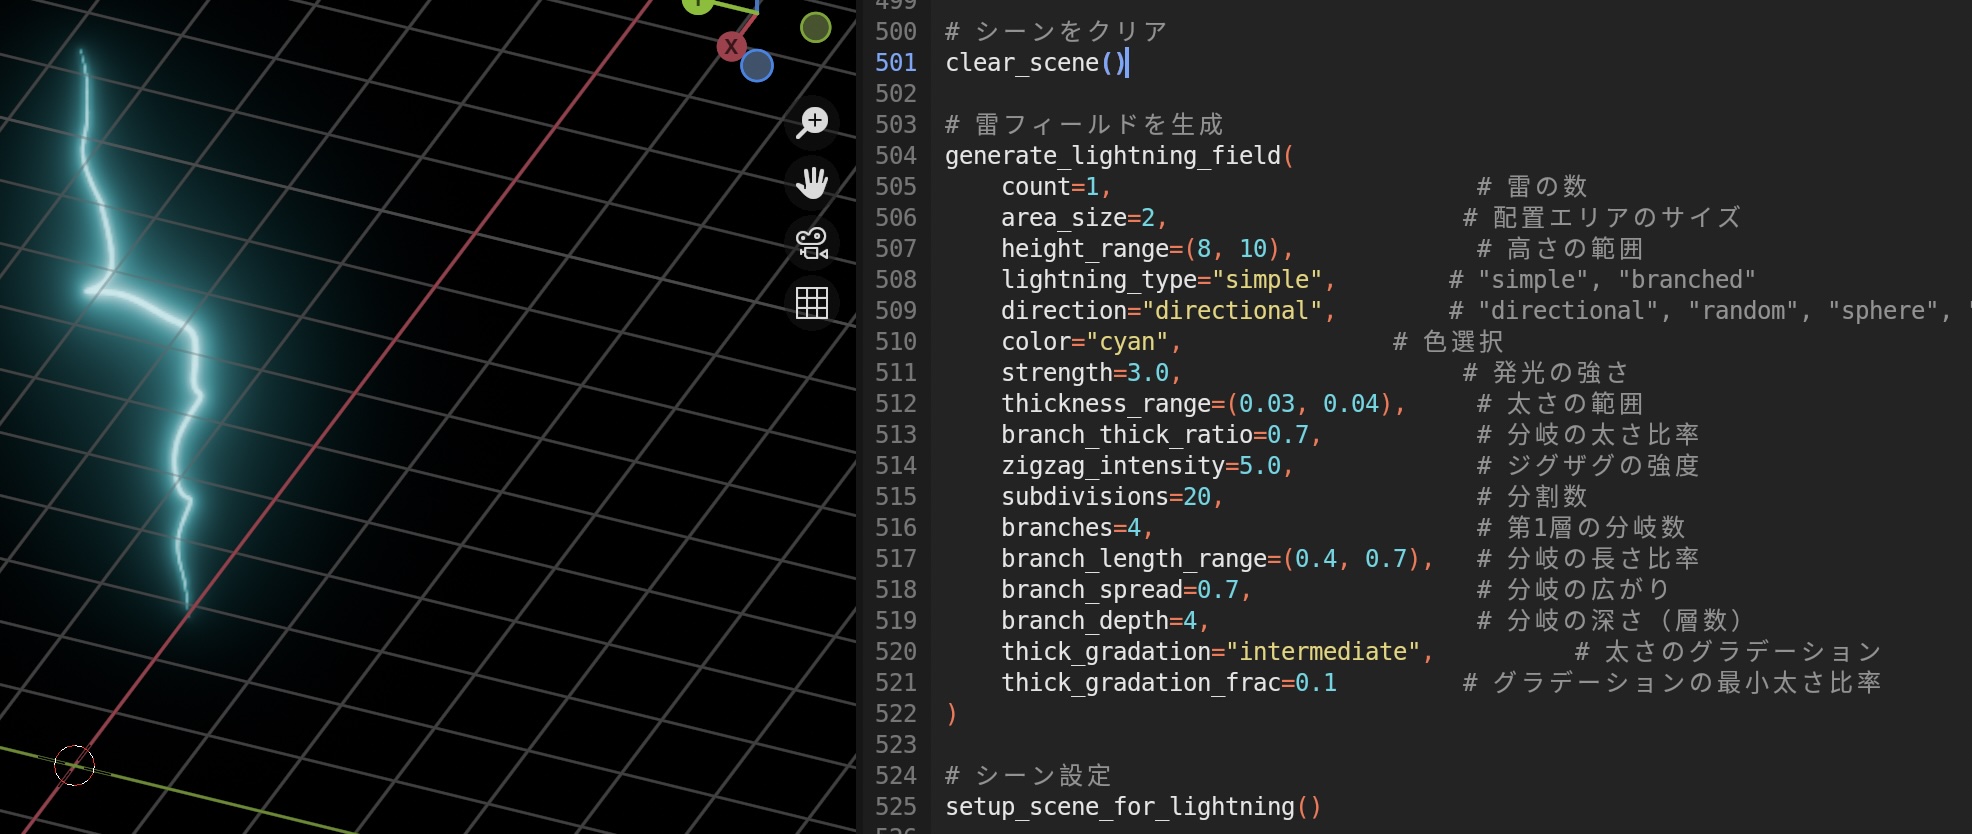
シンプルな雷
例2: 分岐つきの雷で、分岐の方向が主軸と平行に近い、まとまった形のものです。
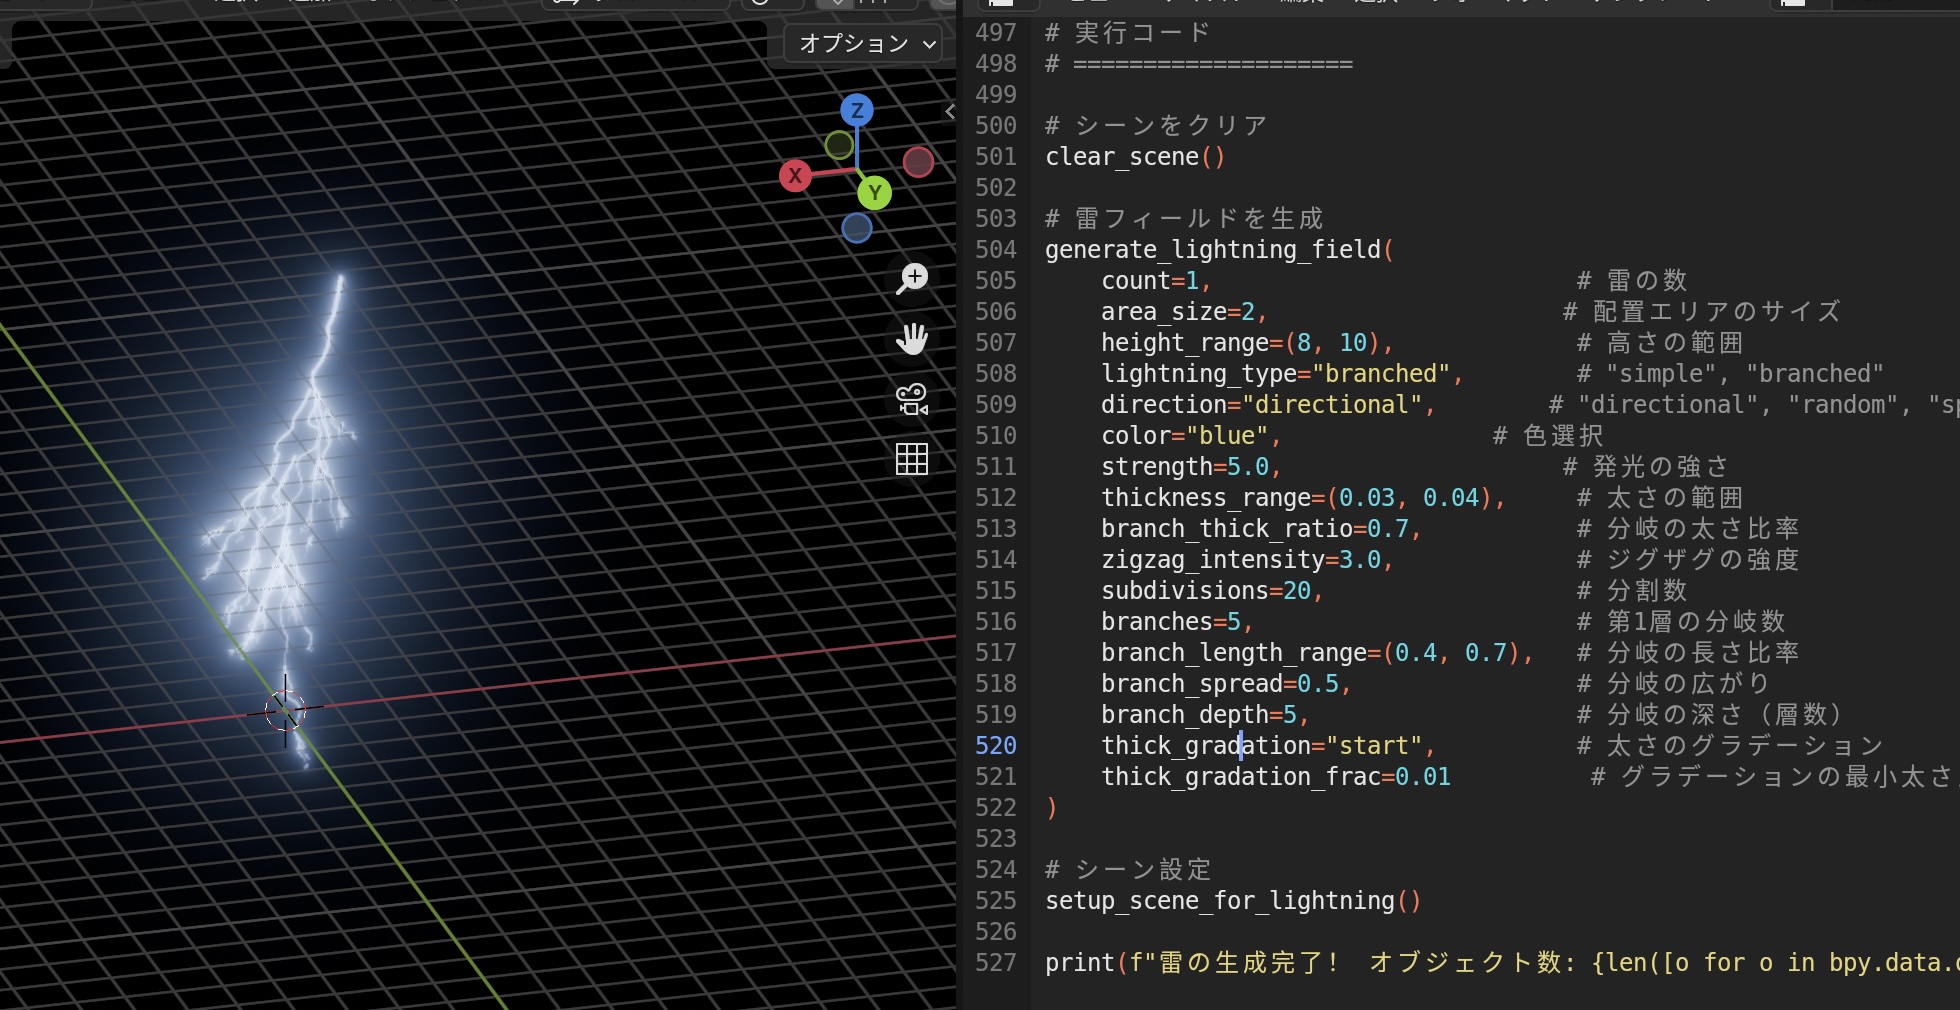
分岐つき
例3: 同じく分岐つきの雷ですが、分岐の方向が主軸に対して垂直に近く、広がりのある樹形状の雷です。
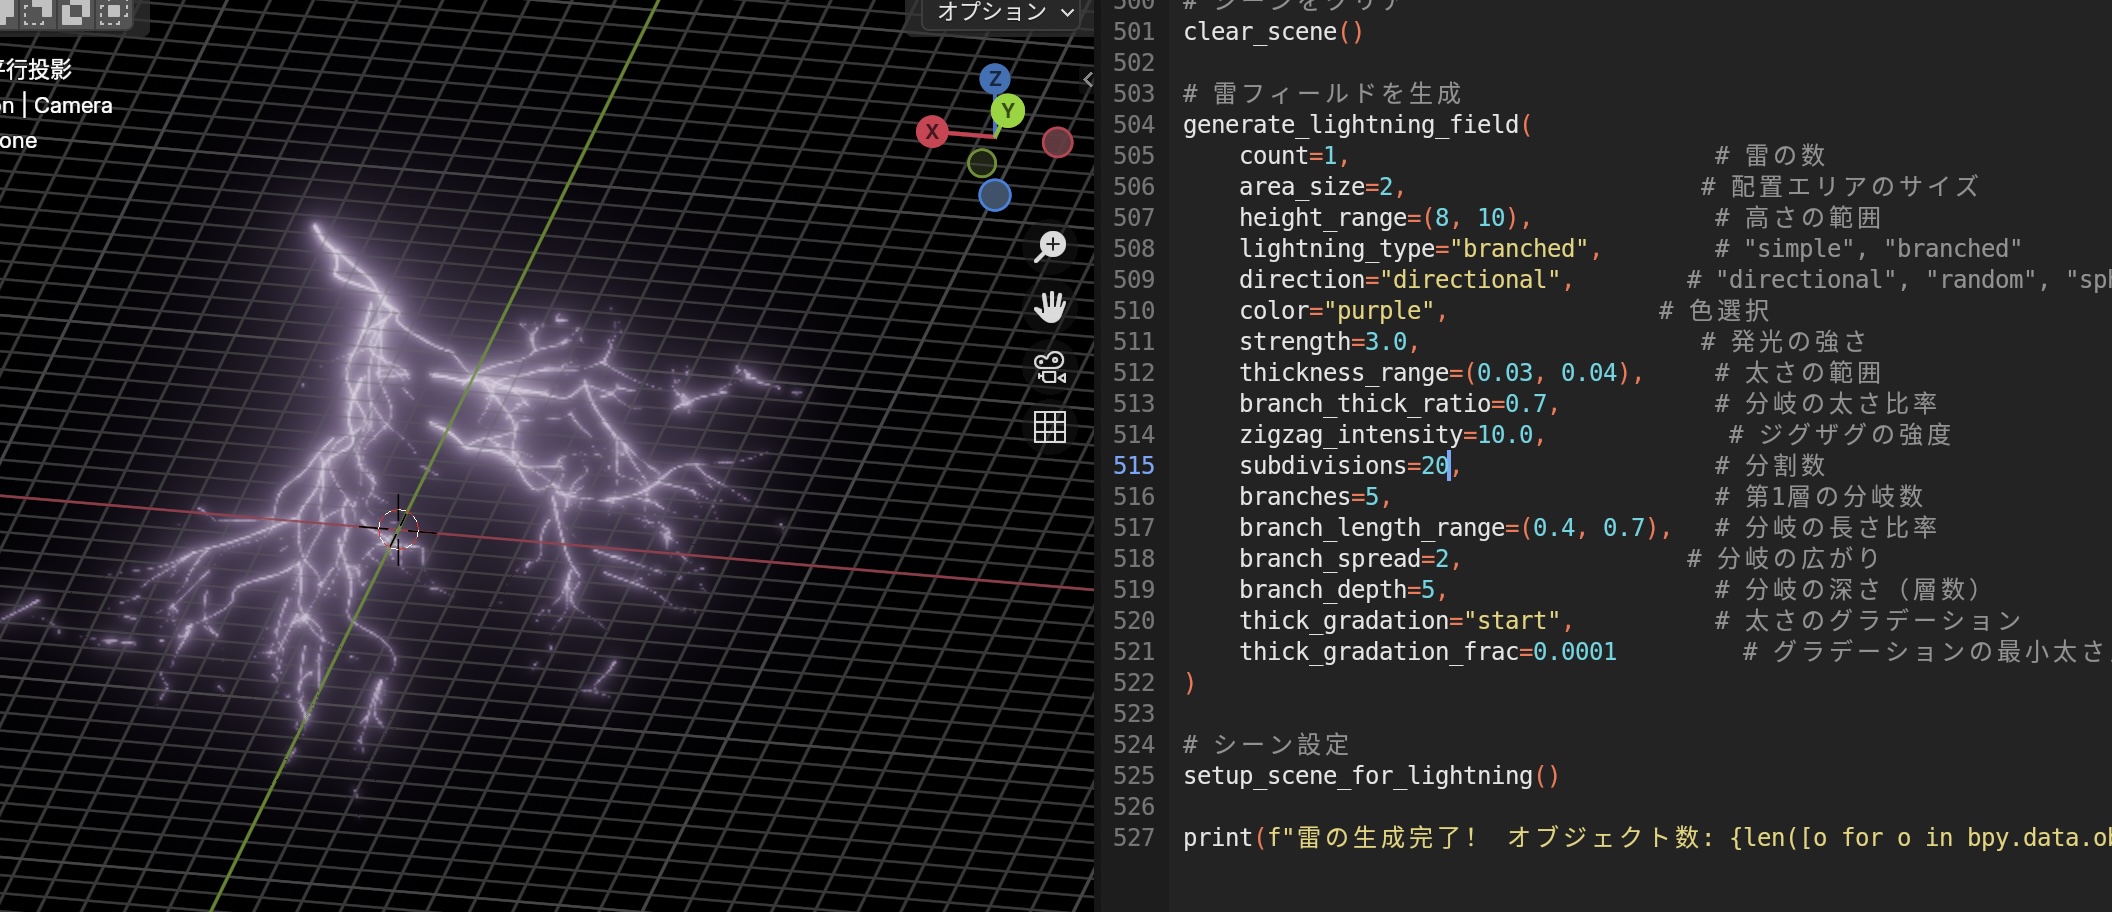
樹形ライク雷
例4: 中心から放射状に広がる雷です。
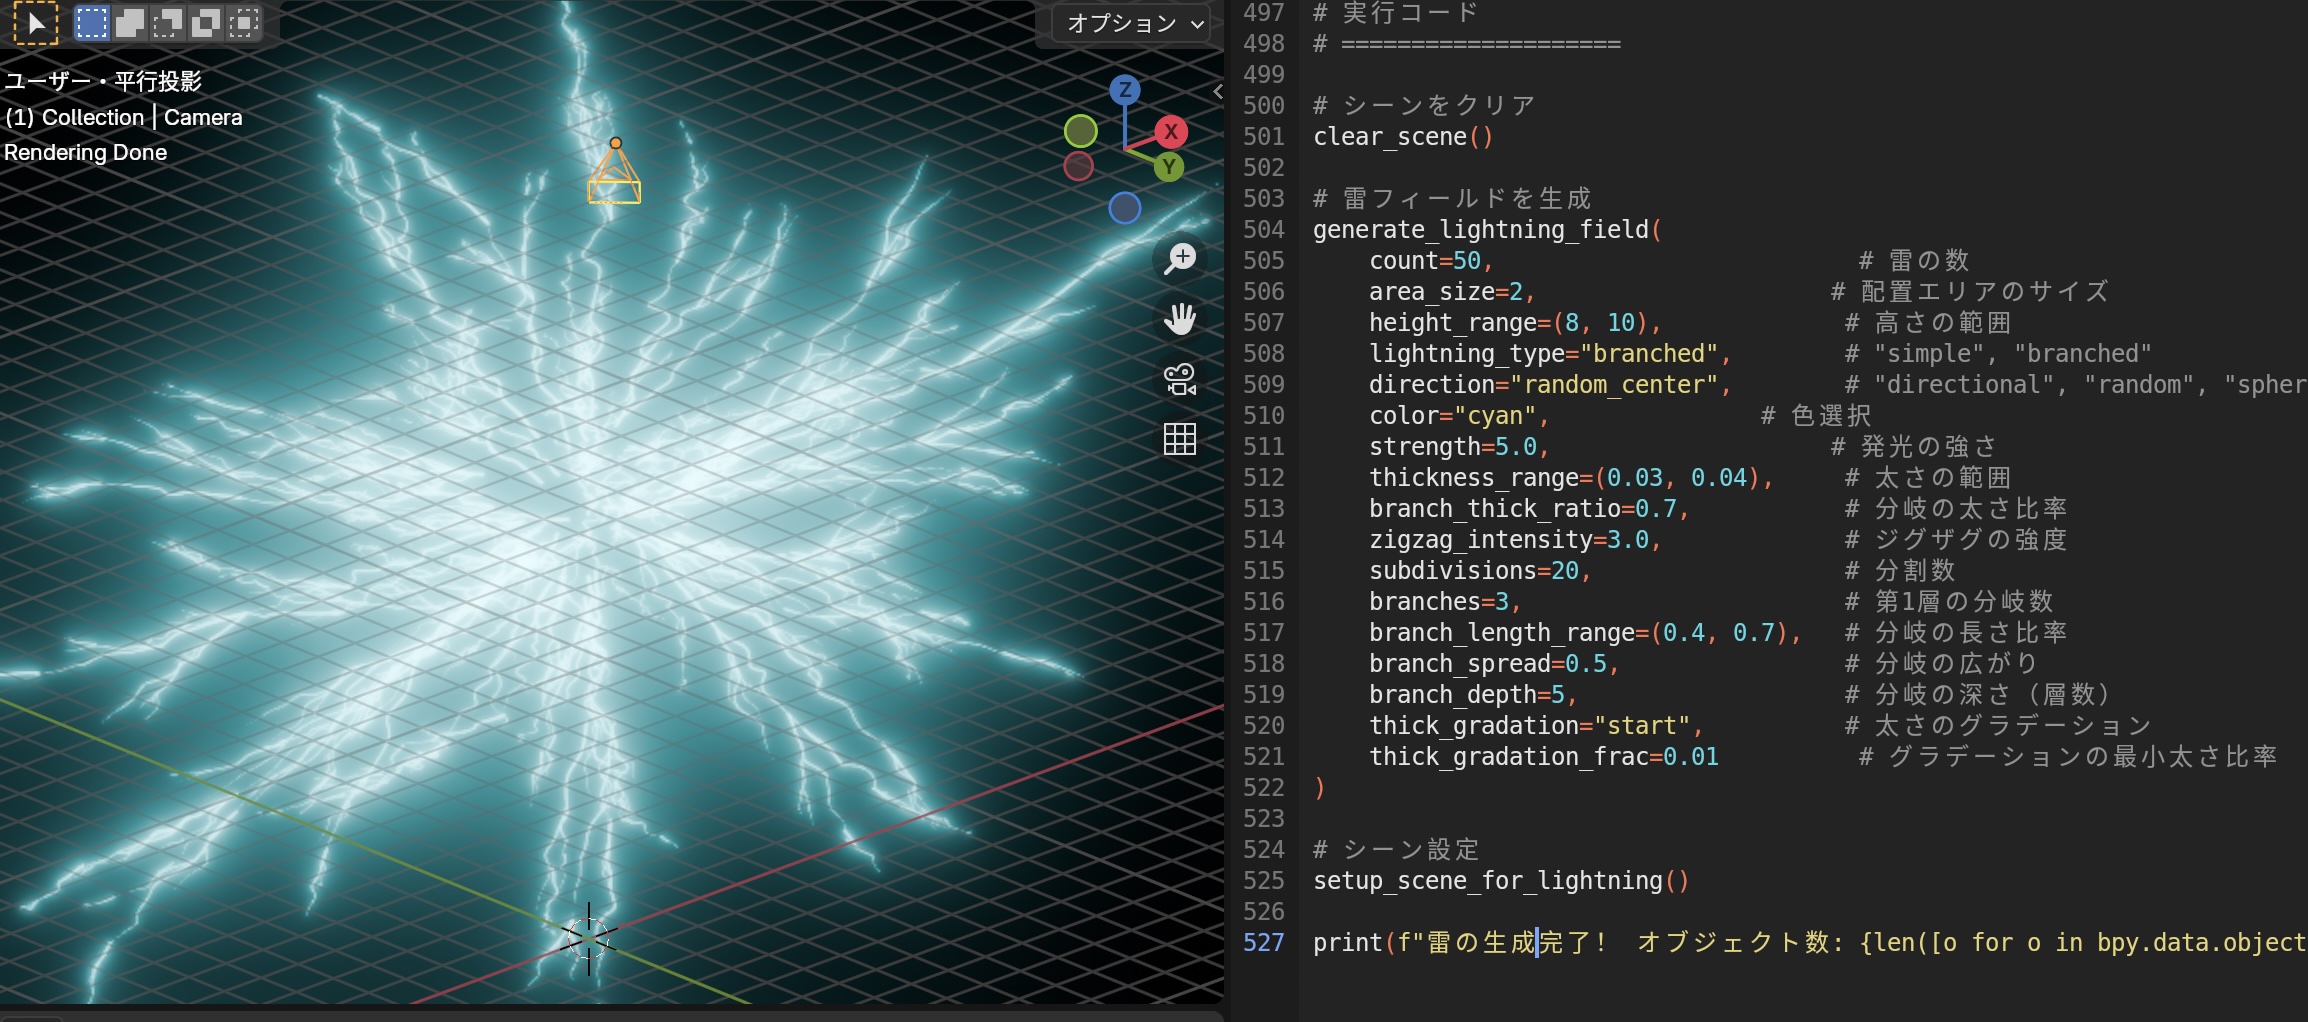
放射状雷
例5: 放射状に広がる雷の中心にオブジェクトを配置した例です。random_centerを指定してサイズを適度に大きくすると中心に空間ができるので、そこにボールを配置すると、ボールから放射状に広がる放電模様を描けます。中二病心をくすぐる一枚です。
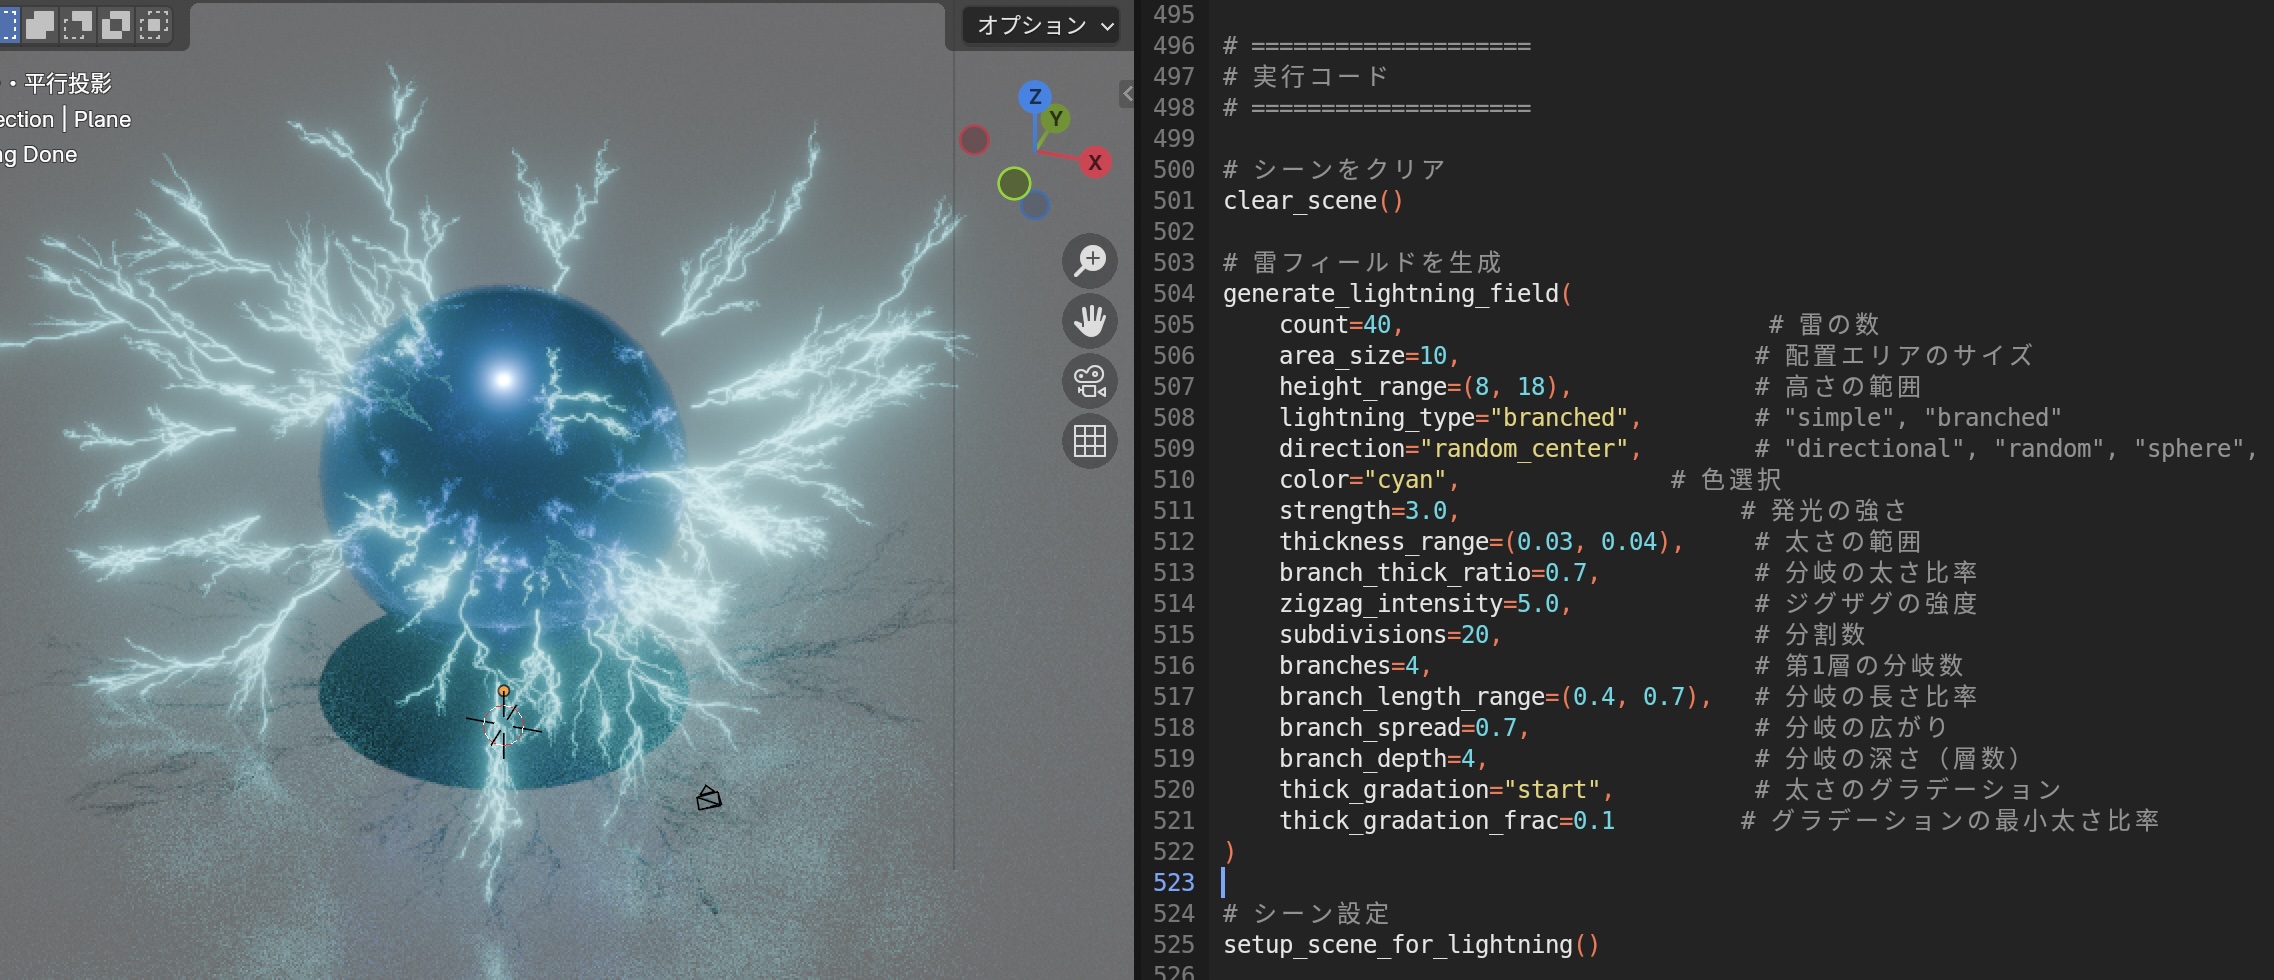
ボールから放電
4. 軌跡エフェクト
作成に時間をかけた割には、たいしたものはできませんでした。とはいえ、一から手作業で作ると意外と大変なので、自動化したメリットは大きいはずです。
コードを表示(python、975行)
import bpy
import math
import random
from mathutils import Vector
import bmesh
# シーンをクリア
def clear_scene():
"""既存のオブジェクトを削除"""
bpy.ops.object.select_all(action='SELECT')
bpy.ops.object.delete(use_global=False)
# メタリックボールを作成
def create_metallic_ball(location=(0, 0, 0), radius=0.5, name="MetallicBall"):
"""青いメタリックボールを作成"""
# UV球を作成
bpy.ops.mesh.primitive_uv_sphere_add(
radius=radius,
location=location,
segments=32,
ring_count=16
)
ball = bpy.context.active_object
ball.name = name
# スムーズシェーディング
bpy.ops.object.shade_smooth()
# メタリックマテリアルを作成
mat = bpy.data.materials.new(name="BlueMetallicMaterial")
mat.use_nodes = True
nodes = mat.node_tree.nodes
# Principled BSDFを取得
bsdf = nodes.get("Principled BSDF")
if bsdf:
bsdf.inputs['Base Color'].default_value = (0.1, 0.3, 0.8, 1.0) # 青色
bsdf.inputs['Metallic'].default_value = 0.99 # ほぼ完全にメタリック
bsdf.inputs['Roughness'].default_value = 0.15 # 少し滑らか
bsdf.inputs['IOR'].default_value = 2.5
# マテリアルを適用
ball.data.materials.append(mat)
return ball
# 背景平面を作成
def create_background_plane(size=30, location=(0, 0, -1)):
"""背景用の平面を作成"""
bpy.ops.mesh.primitive_plane_add(
size=size,
location=location
)
plane = bpy.context.active_object
plane.name = "BackgroundPlane"
# マテリアルを作成
mat = bpy.data.materials.new(name="PlaneMaterial")
mat.use_nodes = True
nodes = mat.node_tree.nodes
bsdf = nodes.get("Principled BSDF")
if bsdf:
bsdf.inputs['Base Color'].default_value = (0.05, 0.05, 0.08, 1.0) # 暗い青灰色
bsdf.inputs['Roughness'].default_value = 0.9
plane.data.materials.append(mat)
return plane
# Sun光源を作成
def create_sun_light(location=(5, 5, 10), rotation=(0.6, 0, 0.8)):
"""Sun光源を作成"""
bpy.ops.object.light_add(
type='SUN',
location=location
)
sun = bpy.context.active_object
sun.name = "SunLight"
sun.rotation_euler = rotation
# 光の設定
sun.data.energy = 2.0
sun.data.color = (1.0, 0.95, 0.8)
sun.data.angle = 0.05
return sun
# エフェクト用マテリアルを作成
def create_effect_material(name, color, alpha=0.5, emission_strength=0):
"""エフェクト用の半透明マテリアルを作成"""
mat = bpy.data.materials.new(name=name)
mat.use_nodes = True
mat.blend_method = 'BLEND'
mat.use_backface_culling = False
nodes = mat.node_tree.nodes
nodes.clear()
# Principled BSDF
bsdf = nodes.new(type='ShaderNodeBsdfPrincipled')
bsdf.inputs['Base Color'].default_value = (*color, 1.0)
bsdf.inputs['Alpha'].default_value = alpha
bsdf.inputs['Roughness'].default_value = 0.5
# Emissionを追加(オプション)
if emission_strength > 0:
emission = nodes.new(type='ShaderNodeEmission')
emission.inputs['Color'].default_value = (*color, 1.0)
emission.inputs['Strength'].default_value = emission_strength
mix = nodes.new(type='ShaderNodeMixShader')
mix.inputs['Fac'].default_value = 0.3
output = nodes.new(type='ShaderNodeOutputMaterial')
links = mat.node_tree.links
links.new(bsdf.outputs[0], mix.inputs[1])
links.new(emission.outputs[0], mix.inputs[2])
links.new(mix.outputs[0], output.inputs[0])
else:
output = nodes.new(type='ShaderNodeOutputMaterial')
mat.node_tree.links.new(bsdf.outputs[0], output.inputs[0])
return mat
# 色のパレット定義(50色)
COLOR_PALETTE = {
# 基本色(16色)
"red": (1.0, 0.2, 0.2),
"blue": (0.2, 0.4, 1.0),
"green": (0.2, 0.8, 0.3),
"yellow": (1.0, 0.9, 0.2),
"orange": (1.0, 0.6, 0.1),
"purple": (0.7, 0.2, 0.9),
"cyan": (0.0, 0.9, 1.0),
"magenta": (1.0, 0.2, 0.8),
"white": (1.0, 1.0, 1.0),
"black": (0.1, 0.1, 0.1),
"gray": (0.5, 0.5, 0.5),
"pink": (1.0, 0.6, 0.8),
"lime": (0.6, 1.0, 0.2),
"brown": (0.6, 0.4, 0.2),
"gold": (1.0, 0.8, 0.3),
"silver": (0.8, 0.8, 0.9),
# 拡張色(34色)
"light_blue": (0.6, 0.8, 1.0),
"dark_blue": (0.1, 0.2, 0.5),
"sky_blue": (0.5, 0.8, 1.0),
"navy": (0.0, 0.1, 0.3),
"light_green": (0.6, 1.0, 0.6),
"dark_green": (0.1, 0.4, 0.1),
"forest_green": (0.2, 0.5, 0.2),
"mint": (0.4, 1.0, 0.7),
"light_red": (1.0, 0.5, 0.5),
"dark_red": (0.5, 0.1, 0.1),
"crimson": (0.9, 0.1, 0.3),
"rose": (1.0, 0.3, 0.5),
"light_purple": (0.9, 0.6, 1.0),
"dark_purple": (0.4, 0.1, 0.5),
"violet": (0.8, 0.3, 1.0),
"lavender": (0.7, 0.6, 0.9),
"light_yellow": (1.0, 1.0, 0.6),
"dark_yellow": (0.7, 0.6, 0.1),
"amber": (1.0, 0.7, 0.0),
"peach": (1.0, 0.8, 0.6),
"light_orange": (1.0, 0.8, 0.4),
"dark_orange": (0.8, 0.4, 0.0),
"coral": (1.0, 0.5, 0.4),
"salmon": (1.0, 0.6, 0.5),
"light_gray": (0.8, 0.8, 0.8),
"dark_gray": (0.3, 0.3, 0.3),
"beige": (0.9, 0.9, 0.7),
"ivory": (1.0, 1.0, 0.9),
"turquoise": (0.2, 0.9, 0.8),
"teal": (0.0, 0.5, 0.5),
"aqua": (0.0, 1.0, 1.0),
"indigo": (0.3, 0.0, 0.5),
"maroon": (0.5, 0.0, 0.2),
"olive": (0.5, 0.5, 0.0),
}
# 軌道を生成
def create_trajectory_points(
trajectory_type="linear",
start_pos=(0, 0, 5),
end_pos=(10, 0, 0),
height=8,
num_points=30
):
"""軌道の点群を生成"""
points = []
if trajectory_type == "linear":
# 直線軌道
for i in range(num_points):
t = i / (num_points - 1)
point = Vector(start_pos).lerp(Vector(end_pos), t)
points.append(point)
elif trajectory_type == "circular":
# 円軌道
center = Vector(((start_pos[0] + end_pos[0])/2,
(start_pos[1] + end_pos[1])/2,
(start_pos[2] + end_pos[2])/2))
radius = (Vector(end_pos) - Vector(start_pos)).length / 2
for i in range(num_points):
angle = (i / (num_points - 1)) * math.pi
x = center.x + radius * math.cos(angle)
y = center.y
z = center.z + radius * math.sin(angle)
points.append(Vector((x, y, z)))
elif trajectory_type == "sine":
# サイン波軌道
for i in range(num_points):
t = i / (num_points - 1)
x = start_pos[0] + (end_pos[0] - start_pos[0]) * t
y = start_pos[1] + math.sin(t * 4 * math.pi) * 2
z = start_pos[2] + (end_pos[2] - start_pos[2]) * t
points.append(Vector((x, y, z)))
return points
# =====================================
# 動きを表現するメッシュエフェクト
# =====================================
def create_afterimage_effect(trajectory_points, ball_radius=0.3,
initial_alpha=0.8, initial_emission=5.0,
color=(0.3, 0.5, 1.0),
alpha_decay=1.0, emission_decay=0.8, scale_decay=0.3):
"""残像エフェクト:複数の半透明ボールを配置
Parameters:
-----------
initial_alpha : float
初期(最新の残像)のアルファ値
initial_emission : float
初期のエミッション強度
alpha_decay : float
アルファ値の減衰係数(0.0-1.0)
emission_decay : float
エミッションの減衰係数(0.0-1.0)
scale_decay : float
スケールの減衰係数(0.0-1.0)
"""
afterimages = []
# 間隔を開けて残像を配置
for i in range(0, len(trajectory_points), 3):
# 進行度
progress = i / len(trajectory_points)
# 透明度を徐々に下げる
alpha = max(0.01, initial_alpha * (1.0 - progress * alpha_decay))
# エミッション強度も徐々に下げる
emission = max(0.0, initial_emission * (1.0 - progress * emission_decay))
# スケールを徐々に小さくする
scale = ball_radius * max(0.01, (1.0 - progress * scale_decay)) # 最小サイズを保証
# 残像マテリアル(各残像ごとに作成)
mat = create_effect_material(
f"AfterImageMat_{i}",
color=color,
alpha=alpha,
emission_strength=emission
)
# 球を作成
bpy.ops.mesh.primitive_uv_sphere_add(
radius=scale,
location=trajectory_points[i],
segments=16,
ring_count=8
)
sphere = bpy.context.active_object
sphere.name = f"AfterImage_{i}"
# マテリアルを適用
sphere.data.materials.append(mat)
afterimages.append(sphere)
return afterimages
def create_speed_lines(trajectory_points, ball_radius=0.3,
alpha=0.6, emission_strength=5.0,
color=(0.7, 0.8, 1.0),
line_thickness=None, line_length=5.0,
alpha_gradation=0.5, num_lines=12,
random_placement=False,
length_range = (0.1, 1)):
"""スピードライン:動きの方向に沿った線
Parameters:
-----------
line_thickness : float or None
線の太さ。Noneの場合はボール断面積から自動計算
line_length : float
線の長さ
alpha_gradation : float
長さ方向のアルファ減衰(0.0で減衰なし、1.0で完全減衰)
num_lines : int
線の本数
random_placement : bool
Trueの場合、円内にランダム配置(軌道に沿った垂直線)
"""
speed_lines = []
# 軌道の始点と終点
start_pos = trajectory_points[0]
end_pos = trajectory_points[-1]
# 全体の進行方向を取得
overall_direction = (end_pos - start_pos).normalized()
# 線の太さを決定
if line_thickness is None:
# ボールの断面積から自動計算
ball_area = math.pi * ball_radius * ball_radius
line_thickness = math.sqrt(ball_area / (num_lines * math.pi)) * 0.8
if random_placement:
# ランダム配置(軌道に沿った垂直線)
for i in range(num_lines):
# 軌道上のランダムな位置を選択
t = random.uniform(length_range[0], length_range[1]) # 軌道の20%~80%の範囲
idx = int(t * (len(trajectory_points) - 1))
end_pos = trajectory_points[idx]
# その点での進行方向
if idx < len(trajectory_points) - 1:
local_direction = (trajectory_points[idx + 1] - trajectory_points[idx]).normalized()
else:
local_direction = overall_direction
# 進行方向に垂直な平面での円内ランダム位置
if abs(local_direction.z) < 0.99:
up = Vector((0, 0, 1))
else:
up = Vector((1, 0, 0))
right = local_direction.cross(up).normalized()
up = right.cross(local_direction).normalized()
# 円内のランダムな位置
angle = random.uniform(0, 2 * math.pi)
r = ball_radius * math.sqrt(random.uniform(0, 1)) # 円内に均等分布
offset = right * (r * math.cos(angle)) + up * (r * math.sin(angle))
# 線の開始点と終了点(進行方向に沿って)
start = start_pos + offset# - local_direction * line_length * 0.5
end = end_pos + offset# + local_direction * line_length * 0.5
# カーブを作成
curve_data = bpy.data.curves.new(name=f"SpeedLine_{i}", type='CURVE')
curve_data.dimensions = '3D'
curve_data.fill_mode = 'FULL'
curve_data.bevel_depth = line_thickness
curve_data.bevel_resolution = 4
# グラデーション用にNURBSスプライン使用
spline = curve_data.splines.new('NURBS')
segments = 10
spline.points.add(segments)
for j in range(segments + 1):
t = j / segments
pos = start.lerp(end, t)
spline.points[j].co = (*pos, 1)
# 半径でアルファグラデーションを表現
radius = 1.0 - t * alpha_gradation
spline.points[j].radius = radius
spline.use_endpoint_u = True
curve_obj = bpy.data.objects.new(f"SpeedLine_{i}", curve_data)
bpy.context.collection.objects.link(curve_obj)
# マテリアル
mat = create_effect_material(
f"SpeedLineMat_{i}",
color=color,
alpha=alpha,
emission_strength=emission_strength
)
curve_obj.data.materials.append(mat)
speed_lines.append(curve_obj)
else:
# 円形配置(従来の配置)
# 軌道の中間点付近から線を生成
mid_idx = len(trajectory_points) // 2
center_point = trajectory_points[mid_idx]
# 進行方向を取得
if mid_idx > 0:
direction = (trajectory_points[mid_idx + 1] - trajectory_points[mid_idx - 1]).normalized()
else:
direction = (trajectory_points[1] - trajectory_points[0]).normalized()
for i in range(num_lines):
angle = (i / num_lines) * 2 * math.pi
# 円形配置のオフセット
offset_radius = ball_radius * 0.7
offset = Vector((
math.cos(angle) * offset_radius,
math.sin(angle) * offset_radius,
0
))
# 方向に垂直な平面での回転を適用
if abs(direction.z) < 0.99:
up = Vector((0, 0, 1))
else:
up = Vector((1, 0, 0))
right = direction.cross(up).normalized()
up = right.cross(direction).normalized()
actual_offset = right * offset.x + up * offset.y
# 線の開始点と終了点
start = center_point + actual_offset - direction * line_length * 0.6
end = center_point + actual_offset + direction * line_length * 0.4
# グラデーション用に複数セグメントで作成
segments = 10
curve_data = bpy.data.curves.new(name=f"SpeedLine_{i}", type='CURVE')
curve_data.dimensions = '3D'
curve_data.fill_mode = 'FULL'
curve_data.bevel_depth = line_thickness
curve_data.bevel_resolution = 4
# NURBSスプラインでグラデーション表現
spline = curve_data.splines.new('NURBS')
spline.points.add(segments)
for j in range(segments + 1):
t = j / segments
pos = start.lerp(end, t)
spline.points[j].co = (*pos, 1)
# 半径でアルファグラデーションを表現
radius = 1.0 - t * alpha_gradation
spline.points[j].radius = radius
spline.use_endpoint_u = True
curve_obj = bpy.data.objects.new(f"SpeedLine_{i}", curve_data)
bpy.context.collection.objects.link(curve_obj)
# マテリアル
mat = create_effect_material(
f"SpeedLineMat_{i}",
color=color,
alpha=alpha,
emission_strength=emission_strength
)
curve_obj.data.materials.append(mat)
speed_lines.append(curve_obj)
return speed_lines
def create_tapered_cylinder(trajectory_points, ball_radius=0.3,
alpha=0.4, emission_strength=3.0,
color=(0.5, 0.7, 1.0),
taper_factor=0.1,
alpha_gradation=0.5):
"""テーパー円筒:ボールから離れるほど細くなる円筒
Parameters:
-----------
taper_factor : float
終端での半径の縮小率(0.1 = 終端で10%のサイズ)
alpha_gradation : float
長さ方向のアルファ減衰(0.0で減衰なし、1.0で始点から終点に向けて完全減衰)
"""
mesh = bpy.data.meshes.new(name="TaperedCylinderMesh")
obj = bpy.data.objects.new("TaperedCylinder", mesh)
bpy.context.collection.objects.link(obj)
bm = bmesh.new()
# 円筒のセグメント数
radial_segments = 16
# 頂点グループを作成(アルファグラデーション用)
vertex_progress_map = {} # 頂点インデックス -> 進行度のマッピング
# 各軌道点で円を作成
for i, point in enumerate(trajectory_points):
# 進行に応じて半径を縮小
t = i / (len(trajectory_points) - 1)
current_radius = ball_radius * (1.0 - t * (1.0 - taper_factor))
# 円の頂点を作成
verts_ring = []
for j in range(radial_segments):
angle = (j / radial_segments) * 2 * math.pi
# 円上の点
offset = Vector((
math.cos(angle) * current_radius,
math.sin(angle) * current_radius,
0
))
# 軌道の接線方向を計算
if i < len(trajectory_points) - 1:
tangent = (trajectory_points[i + 1] - trajectory_points[i]).normalized()
elif i > 0:
tangent = (trajectory_points[i] - trajectory_points[i - 1]).normalized()
else:
tangent = Vector((1, 0, 0))
# 接線に垂直な平面での回転
if abs(tangent.z) < 0.99:
up = Vector((0, 0, 1))
else:
up = Vector((1, 0, 0))
right = tangent.cross(up).normalized()
up = right.cross(tangent).normalized()
actual_offset = right * offset.x + up * offset.y
# 頂点を追加
v = bm.verts.new(point + actual_offset)
verts_ring.append(v)
# 頂点の進行度を記録
vertex_progress_map[len(bm.verts) - 1] = t
# 前のリングと接続(面を作成)
if i > 0:
prev_ring = bm.verts[-radial_segments*2:-radial_segments]
for j in range(radial_segments):
next_j = (j + 1) % radial_segments
# 四角形の面を作成
face_verts = [
prev_ring[j],
prev_ring[next_j],
verts_ring[next_j],
verts_ring[j]
]
try:
bm.faces.new(face_verts)
except:
pass # 重複面のエラーを無視
# メッシュを更新
bm.to_mesh(mesh)
bm.free()
# スムーズシェーディングを適用
bpy.context.view_layer.objects.active = obj
obj.select_set(True)
bpy.ops.object.mode_set(mode='OBJECT')
bpy.ops.object.shade_smooth()
# アルファグラデーション用の頂点カラーを作成
if alpha_gradation > 0:
if not obj.data.vertex_colors:
obj.data.vertex_colors.new(name="AlphaGradient")
vertex_colors = obj.data.vertex_colors.active
# 頂点の位置に基づいてアルファ値を設定
for poly in obj.data.polygons:
for loop_idx in poly.loop_indices:
vertex_idx = obj.data.loops[loop_idx].vertex_index
# 頂点の進行度を取得
progress = vertex_progress_map.get(vertex_idx, 0.5)
# アルファグラデーションを適用(始点で濃く、終点で薄く)
alpha_factor = 1.0 - progress * alpha_gradation
# 頂点カラーのアルファチャンネルで表現
vertex_colors.data[loop_idx].color = (1.0, 1.0, 1.0, alpha_factor)
# マテリアル(グラデーション対応)
mat = bpy.data.materials.new(name="TaperedCylinderMat")
mat.use_nodes = True
mat.blend_method = 'BLEND'
mat.use_backface_culling = False
nodes = mat.node_tree.nodes
nodes.clear()
# Principled BSDF
bsdf = nodes.new(type='ShaderNodeBsdfPrincipled')
bsdf.inputs['Base Color'].default_value = (*color, 1.0)
bsdf.inputs['Roughness'].default_value = 0.5
# アルファグラデーション用のノード設定
if alpha_gradation > 0:
# 頂点カラーからアルファを取得
vertex_color = nodes.new(type='ShaderNodeVertexColor')
vertex_color.layer_name = "AlphaGradient"
# アルファと基本アルファを乗算
math_node = nodes.new(type='ShaderNodeMath')
math_node.operation = 'MULTIPLY'
math_node.inputs[0].default_value = alpha
# 接続
mat.node_tree.links.new(vertex_color.outputs['Alpha'], math_node.inputs[1])
mat.node_tree.links.new(math_node.outputs[0], bsdf.inputs['Alpha'])
else:
bsdf.inputs['Alpha'].default_value = alpha
# Emissionを追加
if emission_strength > 0:
emission = nodes.new(type='ShaderNodeEmission')
emission.inputs['Color'].default_value = (*color, 1.0)
emission.inputs['Strength'].default_value = emission_strength
mix = nodes.new(type='ShaderNodeMixShader')
mix.inputs['Fac'].default_value = 0.3
output = nodes.new(type='ShaderNodeOutputMaterial')
links = mat.node_tree.links
links.new(bsdf.outputs[0], mix.inputs[1])
links.new(emission.outputs[0], mix.inputs[2])
links.new(mix.outputs[0], output.inputs[0])
else:
output = nodes.new(type='ShaderNodeOutputMaterial')
mat.node_tree.links.new(bsdf.outputs[0], output.inputs[0])
obj.data.materials.append(mat)
return obj
# カメラ設定
def setup_camera(location=(15, -15, 10), look_at=(5, 0, 2)):
"""カメラを設定"""
bpy.ops.object.camera_add(location=location)
camera = bpy.context.active_object
direction = Vector(look_at) - Vector(location)
rot_quat = direction.to_track_quat('-Z', 'Y')
camera.rotation_euler = rot_quat.to_euler()
return camera
# メイン実行関数
def generate_ball_motion_effect(
# エフェクトタイプ
effect_type="afterimage", # "afterimage", "speed_lines", "tapered_cylinder", "combined"
# 軌道パラメータ
trajectory_type="linear", # "linear", "circular", "sine"
# ボールパラメータ
ball_radius=0.3,
ball_position="start", # "start", "end", "center", "none"
# エフェクトパラメータ
alpha=0.5, # 基本アルファ値
emission_strength=5.0, # 基本エミッション強度
effect_color="cyan", # 色名で指定
# 残像エフェクト専用
afterimage_initial_alpha=0.8,
afterimage_initial_emission=5.0,
afterimage_alpha_decay=1.0,
afterimage_emission_decay=0.8,
afterimage_scale_decay=0.3,
# スピードライン専用
speedline_thickness=None,
speedline_length=5.0,
speedline_num_lines=12, # 線の本数
speedline_random_placement=False, # ランダム配置
speedline_alpha=None,
speedline_emission=None,
speedline_alpha_gradation=0.5,
speedline_length_range=(0.1, 1),
# テーパー円筒専用
taper_factor=0.1,
taper_alpha=None,
taper_emission=None,
taper_alpha_gradation=0.5,
# 軌道設定
start_pos=(0, 0, 5),
end_pos=(10, 0, 0),
trajectory_points_count=30,
# シーン設定
setup_scene_objects=True,
clear_existing=True
):
"""
ボールの動きを表現するメッシュエフェクトを生成
Parameters:
-----------
effect_type : str
- "afterimage": 残像効果
- "speed_lines": スピードライン
- "tapered_cylinder": テーパー円筒
- "combined": 複数のエフェクトを組み合わせ
trajectory_type : str
- "linear": 直線軌道
- "circular": 円軌道
- "sine": サイン波軌道
effect_color : str
エフェクトの色名。使用可能な色(代表16色):
- "red": 赤
- "blue": 青
- "green": 緑
- "yellow": 黄
- "orange": オレンジ
- "purple": 紫
- "cyan": シアン
- "magenta": マゼンタ
- "white": 白
- "pink": ピンク
- "lime": ライム
- "gold": ゴールド
- "silver": シルバー
- "light_blue": 薄青
- "turquoise": ターコイズ
- "violet": バイオレット
その他34色も使用可能
alpha : float
エフェクトの基本透明度(0.0-1.0)
emission_strength : float
エフェクトの基本発光強度
残像エフェクト専用:
-------------------
afterimage_initial_alpha : float
残像エフェクトの初期アルファ値
afterimage_initial_emission : float
残像エフェクトの初期エミッション強度
afterimage_alpha_decay : float
アルファ値の減衰係数(0.0-1.0)
1.0で完全に透明に、0.0で減衰なし
afterimage_emission_decay : float
エミッションの減衰係数(0.0-1.0)
1.0で完全に消灯、0.0で減衰なし
afterimage_scale_decay : float
スケールの減衰係数(0.0-1.0)
1.0で完全に縮小、0.0でサイズ維持
スピードライン専用:
------------------
speedline_thickness : float or None
線の太さ。Noneの場合はボール断面積から自動計算
speedline_length : float
線の長さ
speedline_num_lines : int
線の本数
speedline_random_placement : bool
Trueで円内にランダム配置(垂直線)、Falseで円形配置
speedline_alpha : float or None
スピードライン専用のアルファ値。Noneで基本値使用
speedline_emission : float or None
スピードライン専用のエミッション。Noneで基本値使用
speedline_alpha_gradation : float
長さ方向のアルファ減衰(0.0で減衰なし、1.0で完全減衰)
テーパー円筒専用:
----------------
taper_factor : float
終端での半径縮小率(0.1 = 終端で10%のサイズ)
taper_alpha : float or None
テーパー円筒専用のアルファ値。Noneで基本値使用
taper_emission : float or None
テーパー円筒専用のエミッション。Noneで基本値使用
taper_alpha_gradation : float
長さ方向のアルファ減衰(0.0で減衰なし、1.0で完全減衰)
"""
if clear_existing:
clear_scene()
# 色名から色値に変換
if isinstance(effect_color, str):
color_value = COLOR_PALETTE.get(effect_color, (0.5, 0.7, 1.0))
else:
color_value = effect_color
# シーンオブジェクトを設定
if setup_scene_objects:
create_background_plane()
create_sun_light()
setup_camera()
# 軌道の点を生成
trajectory_points = create_trajectory_points(
trajectory_type=trajectory_type,
start_pos=start_pos,
end_pos=end_pos,
num_points=trajectory_points_count
)
# エフェクトを作成(ボールより先に)
effects = []
if effect_type == "afterimage":
effects = create_afterimage_effect(
trajectory_points,
ball_radius,
initial_alpha=afterimage_initial_alpha,
initial_emission=afterimage_initial_emission,
color=color_value,
alpha_decay=afterimage_alpha_decay,
emission_decay=afterimage_emission_decay,
scale_decay=afterimage_scale_decay
)
elif effect_type == "speed_lines":
# スピードライン用のパラメータを決定
sl_alpha = speedline_alpha if speedline_alpha is not None else alpha
sl_emission = speedline_emission if speedline_emission is not None else emission_strength
effects = create_speed_lines(
trajectory_points,
ball_radius,
alpha=sl_alpha,
emission_strength=sl_emission,
color=color_value,
line_thickness=speedline_thickness,
line_length=speedline_length,
alpha_gradation=speedline_alpha_gradation,
num_lines=speedline_num_lines,
random_placement=speedline_random_placement,
length_range=speedline_length_range,
)
elif effect_type == "tapered_cylinder":
# テーパー円筒用のパラメータを決定
tc_alpha = taper_alpha if taper_alpha is not None else alpha
tc_emission = taper_emission if taper_emission is not None else emission_strength
effects = [create_tapered_cylinder(
trajectory_points,
ball_radius,
alpha=tc_alpha,
emission_strength=tc_emission,
color=color_value,
taper_factor=taper_factor,
alpha_gradation=taper_alpha_gradation
)]
elif effect_type == "combined":
# 複数のエフェクトを組み合わせ
effects.extend(create_afterimage_effect(
trajectory_points,
ball_radius,
initial_alpha=afterimage_initial_alpha * 0.6, # 少し薄く
initial_emission=afterimage_initial_emission * 0.6,
color=color_value,
alpha_decay=afterimage_alpha_decay,
emission_decay=afterimage_emission_decay,
scale_decay=afterimage_scale_decay
))
# スピードライン用のパラメータ
sl_alpha = speedline_alpha if speedline_alpha is not None else alpha * 0.8
sl_emission = speedline_emission if speedline_emission is not None else emission_strength * 0.8
effects.extend(create_speed_lines(
trajectory_points,
ball_radius,
alpha=sl_alpha,
emission_strength=sl_emission,
color=color_value,
line_thickness=speedline_thickness,
line_length=speedline_length,
alpha_gradation=speedline_alpha_gradation,
num_lines=speedline_num_lines,
random_placement=speedline_random_placement
))
# ボールを配置(エフェクトの後に)
ball = None
if ball_position != "none":
if ball_position == "start":
pos = trajectory_points[0]
elif ball_position == "end":
pos = trajectory_points[-1]
elif ball_position == "center":
pos = trajectory_points[len(trajectory_points)//2]
else:
pos = trajectory_points[0]
ball = create_metallic_ball(location=pos, radius=ball_radius)
# レンダリング設定
bpy.context.scene.render.engine = 'CYCLES'
bpy.context.scene.cycles.samples = 128
print(f"Motion effect '{effect_type}' created with {len(trajectory_points)} trajectory points")
return ball, effects
generate_ball_motion_effect(
# エフェクトタイプ
effect_type="speed_lines", # "afterimage", "speed_lines", "tapered_cylinder", "combined"
# 軌道パラメータ
trajectory_type="linear", # "linear", "circular", "sine"
# ボールパラメータ
ball_radius=0.3,
ball_position="start", # "start", "end", "center", "none"
# エフェクトパラメータ
alpha=0.5, # 基本アルファ値
emission_strength=5.0, # 基本エミッション強度
effect_color="cyan", # 色名で指定
# 残像エフェクト専用
afterimage_initial_alpha=0.8,
afterimage_initial_emission=5.0,
afterimage_alpha_decay=1.0,
afterimage_emission_decay=0.8,
afterimage_scale_decay=0.3,
# スピードライン専用
speedline_thickness=None,
speedline_length=10.0,
speedline_num_lines=12, # 線の本数
speedline_random_placement=True, # ランダム配置
speedline_alpha=None,
speedline_emission=1,
speedline_alpha_gradation=4,
speedline_length_range=(0.3, 1),
# テーパー円筒専用
taper_factor=0.1,
taper_alpha=None,
taper_emission=None,
taper_alpha_gradation=0.5,
# 軌道設定
start_pos=(0, 0, 5),
end_pos=(10, 0, 0),
trajectory_points_count=30,
# シーン設定
setup_scene_objects=True,
clear_existing=True
)例1: 複数本のラインで軌跡を描画した例です。alphaグラデーションに加えて、ランダム=Trueとし、length_rangeを(0.2, 1)などに設定すると、うまく表現できます。
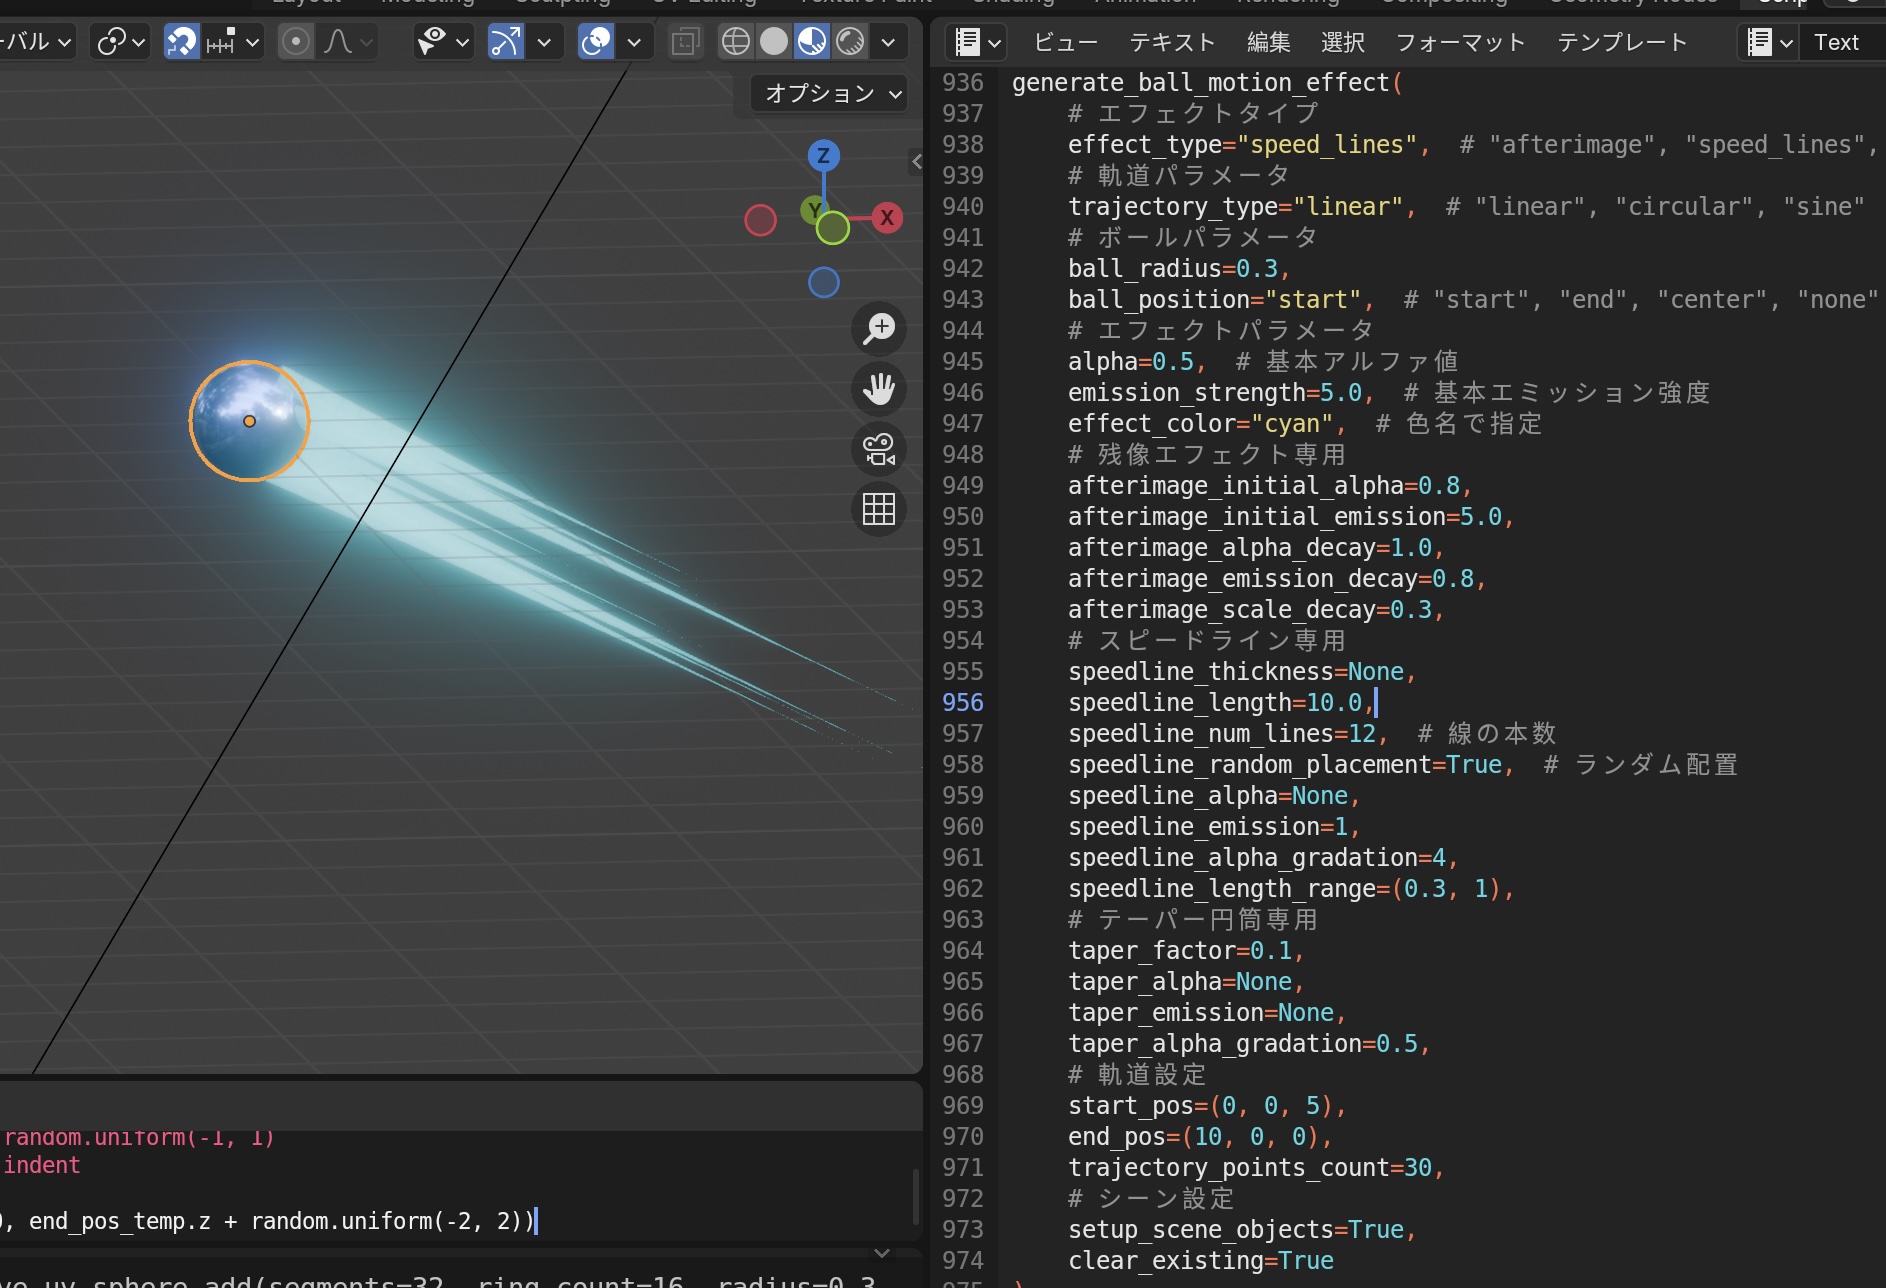
グラデーション線軌跡
例2: 残像でホッピングを表現した例です。alphaグラデーションとサイズグラデーションを設定し、軌跡をcircularにすると、ホッピングしている様子を表現できます。
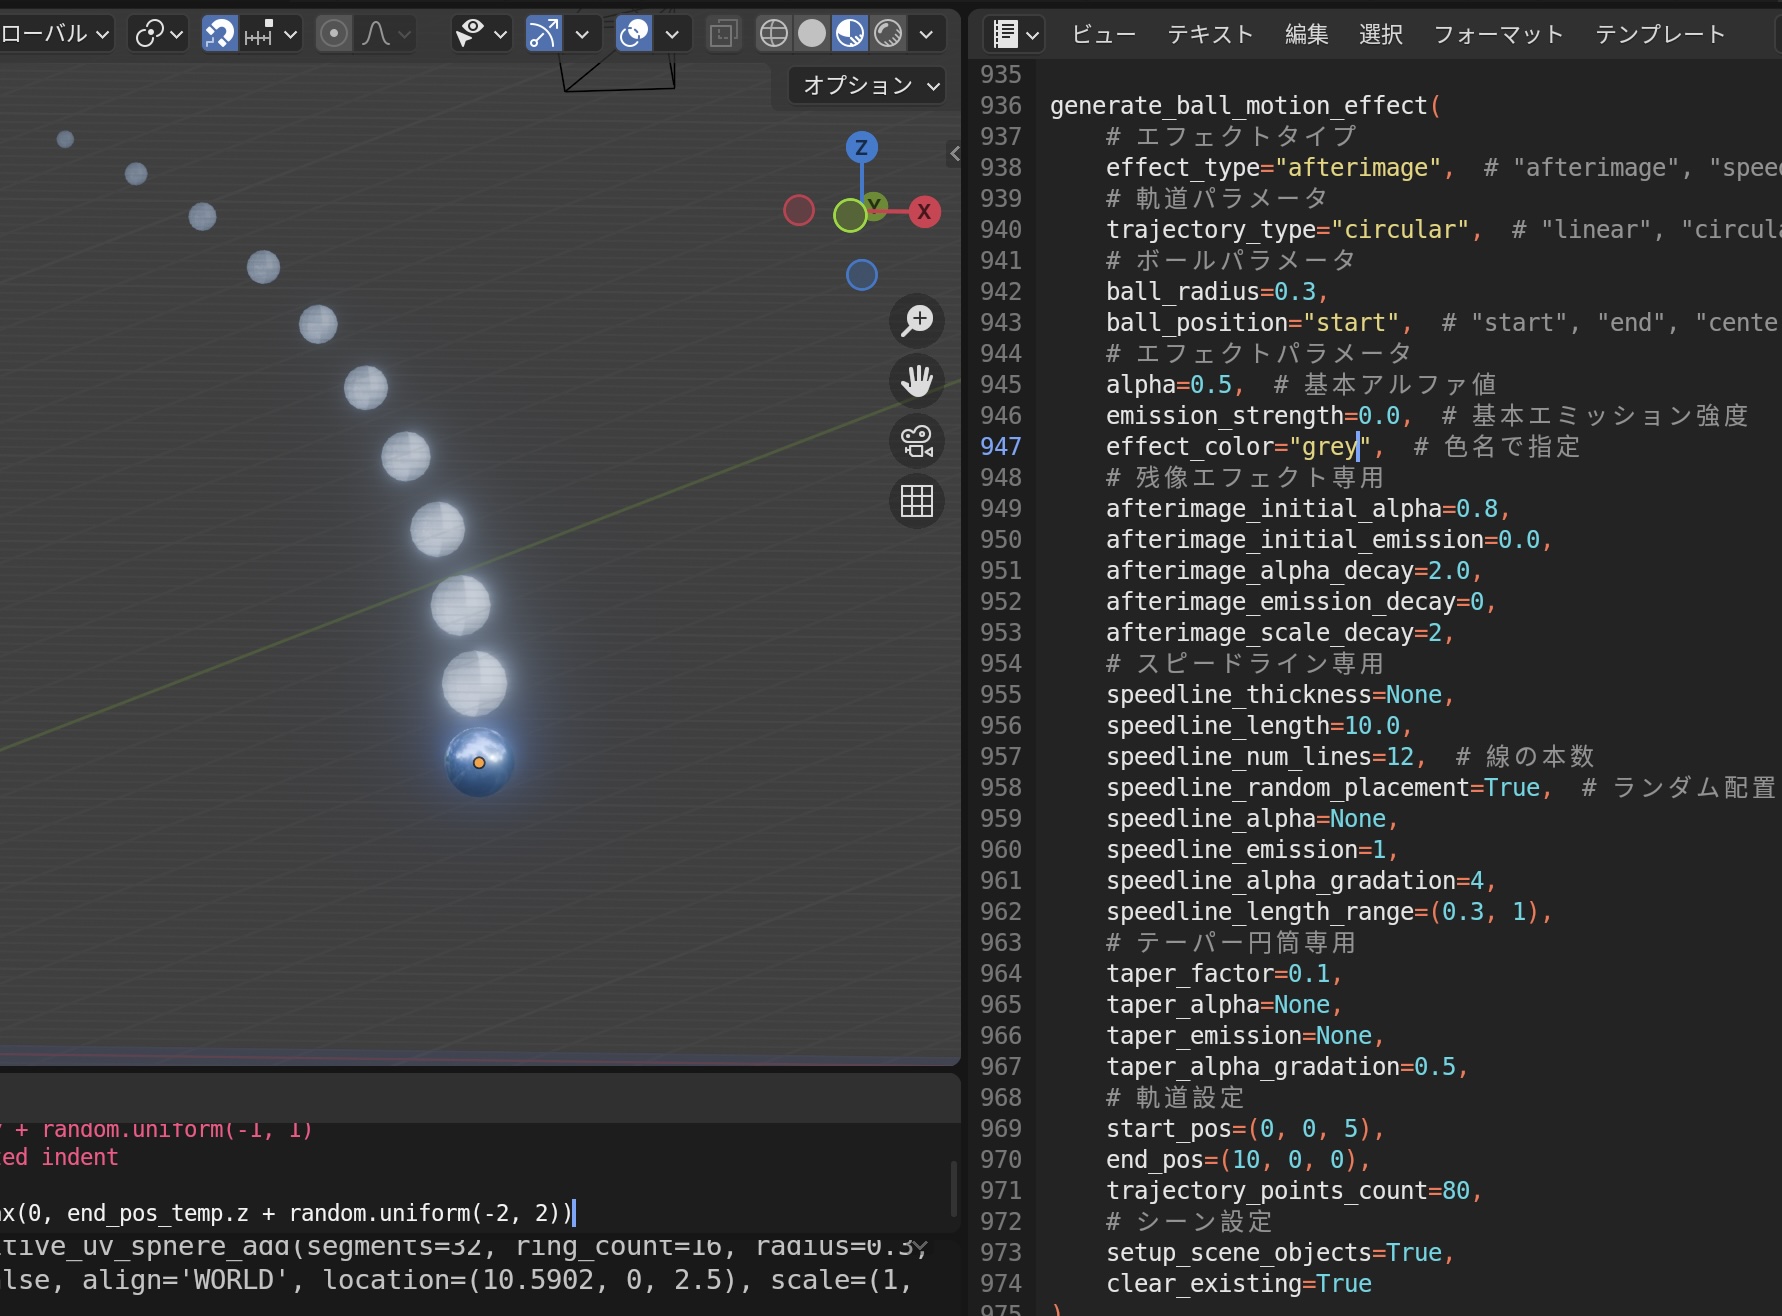
残像の軌跡
例3: 円筒の軌跡です。alphaグラデーションとテーパー比率で形を調整します。下の画像の上部がテーパー1(ストレート)、下部がテーパー0(点に収束)です。
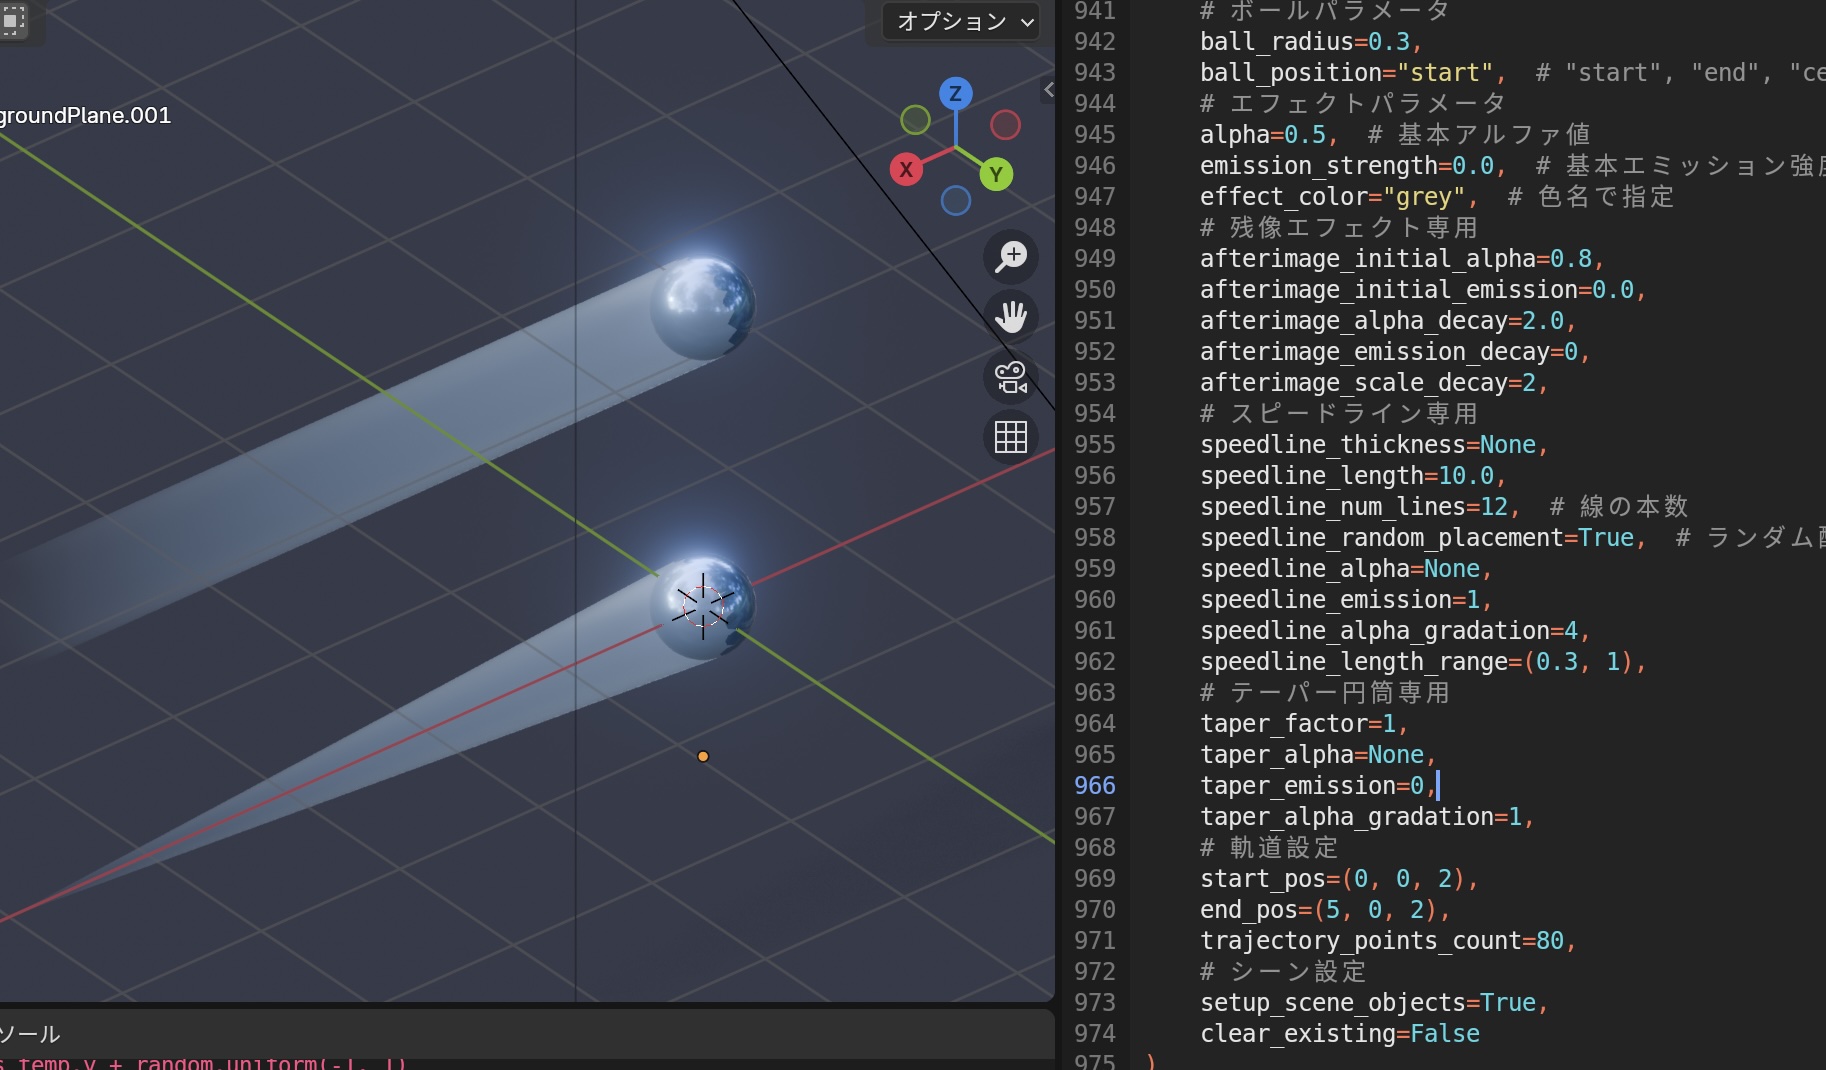
テーパー円筒軌跡
例4: 円筒と線を組み合わせた軌跡です。このように、複数の表現を組み合わせても構いません。
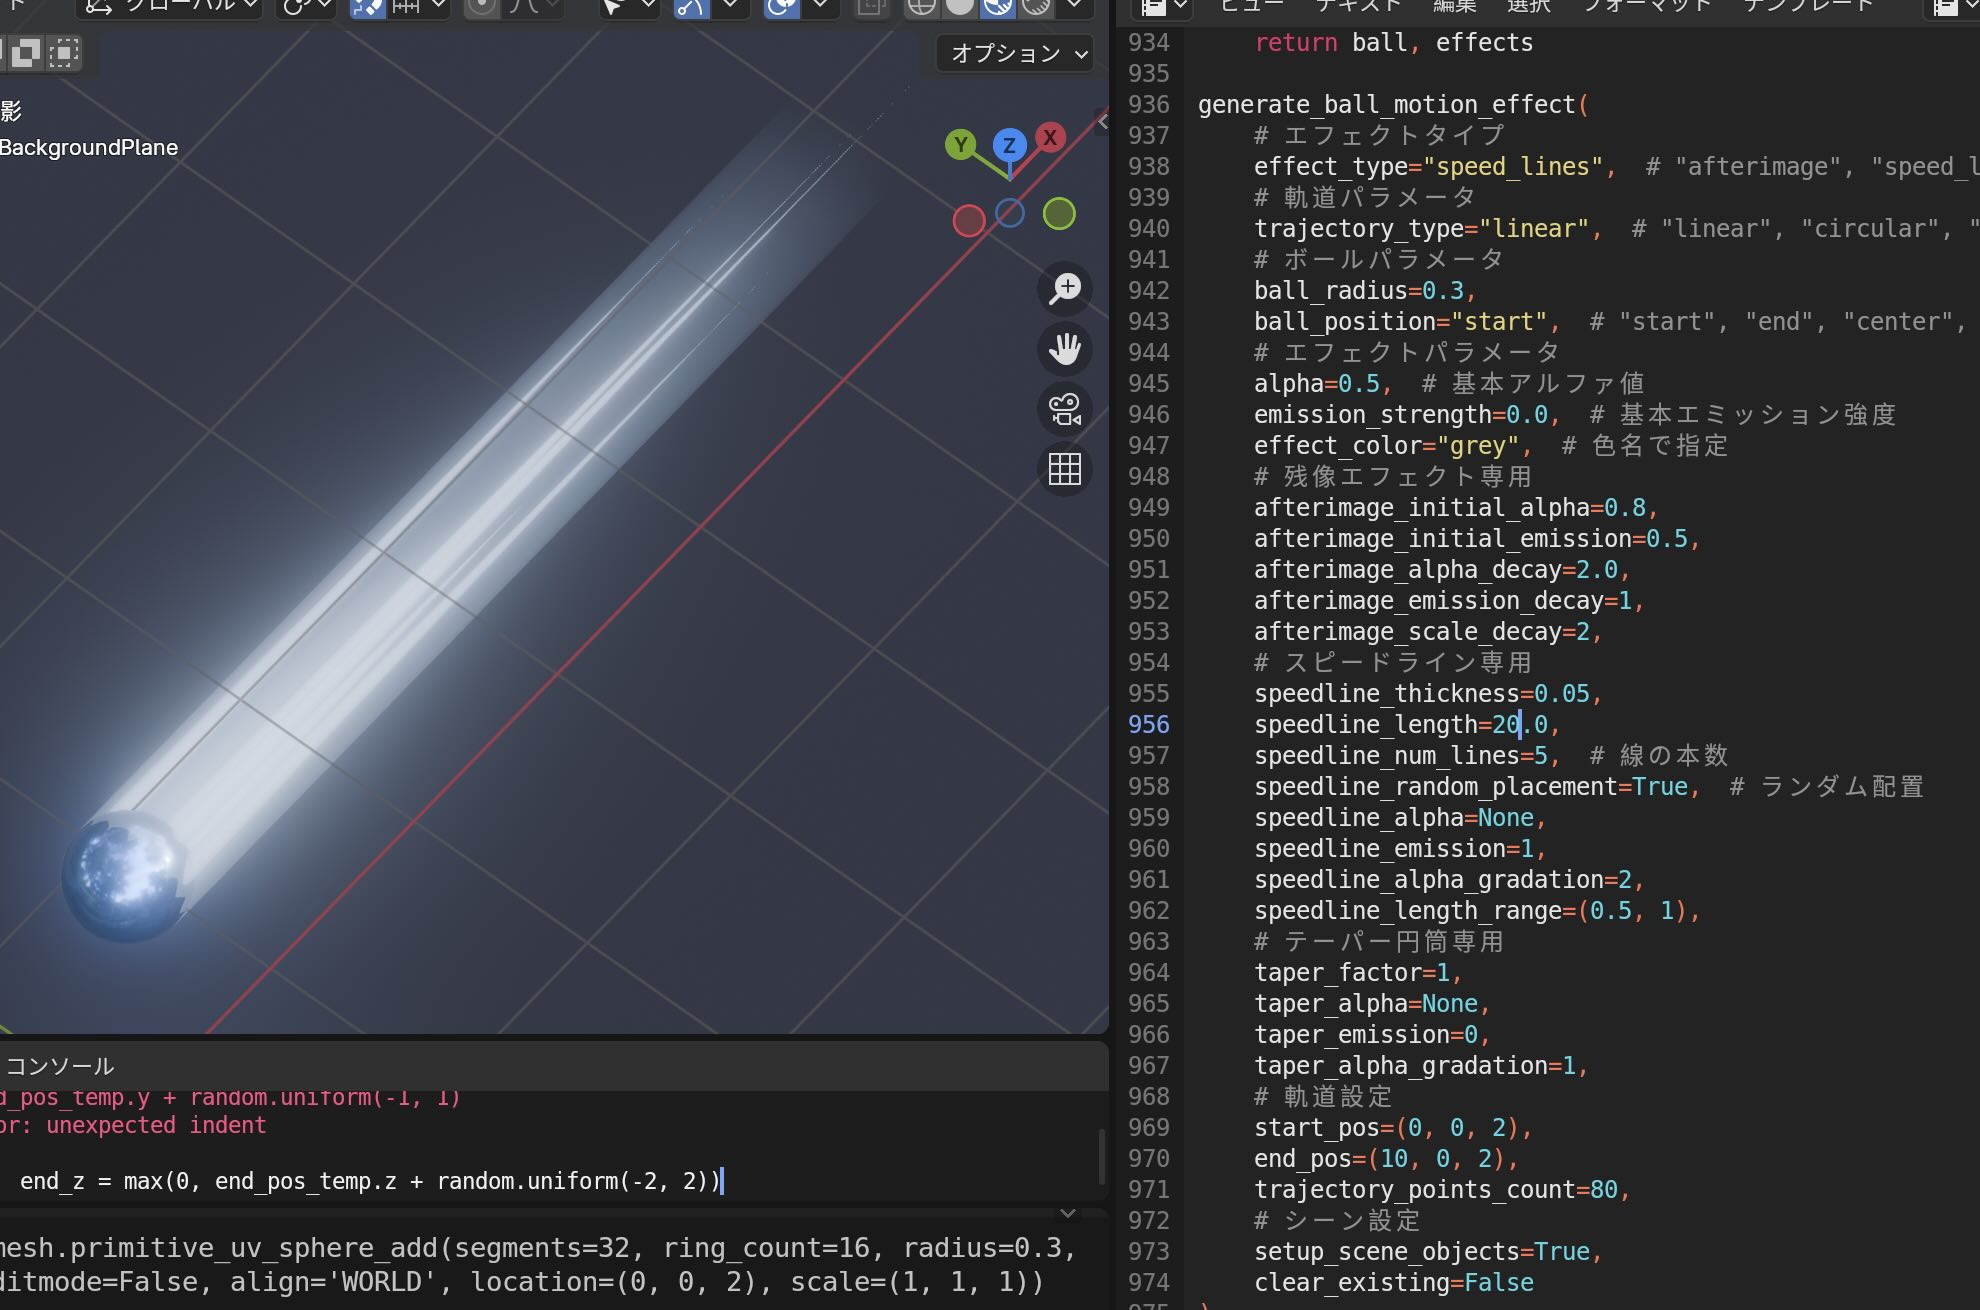
円筒と線の複合軌跡
5. 複合電極
コードを表示(python、1376行)
import bpy
import random
import math
import numpy as np
from scipy.spatial import Voronoi
import warnings
def create_rock_material(name="Rock Material"):
"""
岩石用のマテリアルを作成する関数
"""
mat_name = name
# 既存のマテリアルがあれば使用、なければ新規作成
if mat_name in bpy.data.materials:
mat = bpy.data.materials[mat_name]
else:
mat = bpy.data.materials.new(name=mat_name)
mat.use_nodes = True
# ノードを取得
nodes = mat.node_tree.nodes
links = mat.node_tree.links
# 既存のノードをクリア
nodes.clear()
# Principled BSDFを追加
bsdf = nodes.new(type='ShaderNodeBsdfPrincipled')
bsdf.location = (0, 0)
# マテリアル出力ノードを追加
output = nodes.new(type='ShaderNodeOutputMaterial')
output.location = (300, 0)
# 設定値を適用
bsdf.inputs['Base Color'].default_value = (0.5, 0.8, 1.0, 1.0) # 水色
bsdf.inputs['Alpha'].default_value = 0.5
bsdf.inputs['Metallic'].default_value = 0.4
bsdf.inputs['Roughness'].default_value = 0.1
# ブレンドモードを設定
mat.blend_method = 'BLEND'
mat.show_transparent_back = False
# 接続
links.new(bsdf.outputs['BSDF'], output.inputs['Surface'])
return mat
def create_rock_geometry_nodes(geometry_name="Rock Geometry Nodes", params=None):
"""
Blender 4.2で岩石生成用のジオメトリーノードグループを作成する関数
Args:
geometry_name: ノードグループの名前
params: パラメータの辞書(デフォルト値を上書き)
"""
# デフォルトパラメータ
default_params = {
"Rock Sub-surf": 4,
"Detail Sub-surf": 2,
"Random Shape": 1.0,
"Rock Edges Size": 1.25,
"Edge Crease": 0.2,
"Edge Smoothness": 0,
"Rock Scale": (1, 1, 1),
"Detail Scale": 0,
"Noise Scale": 0.14,
"Detail": 15,
"Roughness": 0.5,
"Distortion": 0,
"Material": None
}
# パラメータをマージ
if params:
default_params.update(params)
# 既存のノードグループがあれば削除
if geometry_name in bpy.data.node_groups:
bpy.data.node_groups.remove(bpy.data.node_groups[geometry_name])
# 新しいジオメトリーノードグループを作成
node_group = bpy.data.node_groups.new(name=geometry_name, type='GeometryNodeTree')
nodes = node_group.nodes
links = node_group.links
# グループ入力を作成
group_input = nodes.new(type='NodeGroupInput')
group_input.location = (-800, 0)
# グループ入力のソケットを定義(デフォルト値付き)
node_group.interface.new_socket(name="Geometry", in_out='INPUT', socket_type='NodeSocketGeometry')
socket = node_group.interface.new_socket(name="Rock Sub-surf", in_out='INPUT', socket_type='NodeSocketInt')
socket.default_value = default_params["Rock Sub-surf"]
socket = node_group.interface.new_socket(name="Detail Sub-surf", in_out='INPUT', socket_type='NodeSocketInt')
socket.default_value = default_params["Detail Sub-surf"]
socket = node_group.interface.new_socket(name="Random Shape", in_out='INPUT', socket_type='NodeSocketFloat')
socket.default_value = default_params["Random Shape"]
socket = node_group.interface.new_socket(name="Rock Edges Size", in_out='INPUT', socket_type='NodeSocketFloat')
socket.default_value = default_params["Rock Edges Size"]
socket = node_group.interface.new_socket(name="Edge Crease", in_out='INPUT', socket_type='NodeSocketFloat')
socket.default_value = default_params["Edge Crease"]
socket = node_group.interface.new_socket(name="Edge Smoothness", in_out='INPUT', socket_type='NodeSocketFloat')
socket.default_value = default_params["Edge Smoothness"]
socket = node_group.interface.new_socket(name="Rock Scale", in_out='INPUT', socket_type='NodeSocketVector')
socket.default_value = default_params["Rock Scale"]
socket = node_group.interface.new_socket(name="Detail Scale", in_out='INPUT', socket_type='NodeSocketFloat')
socket.default_value = default_params["Detail Scale"]
socket = node_group.interface.new_socket(name="Noise Scale", in_out='INPUT', socket_type='NodeSocketFloat')
socket.default_value = default_params["Noise Scale"]
socket = node_group.interface.new_socket(name="Detail", in_out='INPUT', socket_type='NodeSocketFloat')
socket.default_value = default_params["Detail"]
socket = node_group.interface.new_socket(name="Roughness", in_out='INPUT', socket_type='NodeSocketFloat')
socket.default_value = default_params["Roughness"]
socket = node_group.interface.new_socket(name="Distortion", in_out='INPUT', socket_type='NodeSocketFloat')
socket.default_value = default_params["Distortion"]
socket = node_group.interface.new_socket(name="Material", in_out='INPUT', socket_type='NodeSocketMaterial')
socket.default_value = default_params["Material"]
# Subdivision Surface 1
subdiv1 = nodes.new(type='GeometryNodeSubdivisionSurface')
subdiv1.location = (-600, 0)
subdiv1.boundary_smooth = 'ALL'
subdiv1.uv_smooth = 'PRESERVE_BOUNDARIES'
# Transform Geometry
transform = nodes.new(type='GeometryNodeTransform')
transform.location = (-400, 0)
# Subdivision Surface 2
subdiv2 = nodes.new(type='GeometryNodeSubdivisionSurface')
subdiv2.location = (-200, 0)
subdiv2.boundary_smooth = 'ALL'
subdiv2.uv_smooth = 'PRESERVE_BOUNDARIES'
# Voronoi Texture
voronoi = nodes.new(type='ShaderNodeTexVoronoi')
voronoi.location = (-600, -300)
voronoi.voronoi_dimensions = '4D'
voronoi.feature = 'SMOOTH_F1'
voronoi.distance = 'EUCLIDEAN'
voronoi.inputs[3].default_value = 0 # Detail
voronoi.inputs[4].default_value = 0.5 # Roughness
voronoi.inputs[5].default_value = 2 # Lacunarity
voronoi.inputs[8].default_value = 1 # Randomness
# Map Range
map_range = nodes.new(type='ShaderNodeMapRange')
map_range.location = (-400, -300)
map_range.data_type = 'FLOAT'
map_range.interpolation_type = 'LINEAR'
map_range.clamp = False
map_range.inputs[1].default_value = -0.24 # From Min
map_range.inputs[2].default_value = 0.91 # From Max
map_range.inputs[3].default_value = 0.22 # To Min
map_range.inputs[4].default_value = 1 # To Max
# Position 1
position1 = nodes.new(type='GeometryNodeInputPosition')
position1.location = (-200, -300)
# Multiply 1
multiply1 = nodes.new(type='ShaderNodeVectorMath')
multiply1.location = (0, -300)
multiply1.operation = 'MULTIPLY'
# Set Position 1
set_position1 = nodes.new(type='GeometryNodeSetPosition')
set_position1.location = (200, 0)
# Clamp
clamp = nodes.new(type='ShaderNodeClamp')
clamp.location = (-600, -500)
clamp.clamp_type = 'MINMAX'
# Position 2
position2 = nodes.new(type='GeometryNodeInputPosition')
position2.location = (200, -300)
# Multiply 2
multiply2 = nodes.new(type='ShaderNodeVectorMath')
multiply2.location = (400, -300)
multiply2.operation = 'MULTIPLY'
# Set Position 2
set_position2 = nodes.new(type='GeometryNodeSetPosition')
set_position2.location = (600, 0)
# Noise Texture
noise = nodes.new(type='ShaderNodeTexNoise')
noise.location = (-400, -500)
noise.noise_dimensions = '4D'
try:
noise.noise_type = 'FBM'
except:
pass
try:
noise.normalize = True
except:
pass
# Set Shade Smooth
set_shade_smooth = nodes.new(type='GeometryNodeSetShadeSmooth')
set_shade_smooth.location = (800, 0)
set_shade_smooth.domain = 'FACE'
set_shade_smooth.inputs[2].default_value = True # Shade Smooth
# Set Material
set_material = nodes.new(type='GeometryNodeSetMaterial')
set_material.location = (1000, 0)
# Group Output
group_output = nodes.new(type='NodeGroupOutput')
group_output.location = (1200, 0)
node_group.interface.new_socket(name="Geometry", in_out='OUTPUT', socket_type='NodeSocketGeometry')
# 接続を作成
# Group Input -> Subdivision Surface 1
links.new(group_input.outputs["Geometry"], subdiv1.inputs["Mesh"])
links.new(group_input.outputs["Rock Sub-surf"], subdiv1.inputs["Level"])
links.new(group_input.outputs["Edge Crease"], subdiv1.inputs["Edge Crease"])
# Group Input -> Subdivision Surface 2
links.new(group_input.outputs["Detail Sub-surf"], subdiv2.inputs["Level"])
# Group Input -> Voronoi Texture
links.new(group_input.outputs["Random Shape"], voronoi.inputs["W"])
links.new(group_input.outputs["Rock Edges Size"], voronoi.inputs["Scale"])
links.new(group_input.outputs["Edge Smoothness"], voronoi.inputs["Smoothness"])
# Group Input -> Transform Geometry
links.new(group_input.outputs["Rock Scale"], transform.inputs["Scale"])
# Group Input -> Noise Texture
links.new(group_input.outputs["Detail Scale"], noise.inputs["W"])
links.new(group_input.outputs["Noise Scale"], noise.inputs["Scale"])
links.new(group_input.outputs["Detail"], noise.inputs["Detail"])
links.new(group_input.outputs["Distortion"], noise.inputs["Distortion"])
# Group Input -> Clamp
links.new(group_input.outputs["Roughness"], clamp.inputs["Value"])
# Group Input -> Set Material
links.new(group_input.outputs["Material"], set_material.inputs["Material"])
# Subdivision Surface 1 -> Transform Geometry
links.new(subdiv1.outputs["Mesh"], transform.inputs["Geometry"])
# Transform Geometry -> Subdivision Surface 2
links.new(transform.outputs["Geometry"], subdiv2.inputs["Mesh"])
# Voronoi Texture -> Map Range
links.new(voronoi.outputs["Distance"], map_range.inputs["Value"])
# Position 1 -> Multiply 1
links.new(position1.outputs["Position"], multiply1.inputs[0])
# Map Range -> Multiply 1
links.new(map_range.outputs["Result"], multiply1.inputs[1])
# Subdivision Surface 2 -> Set Position 1
links.new(subdiv2.outputs["Mesh"], set_position1.inputs["Geometry"])
# Multiply 1 -> Set Position 1
links.new(multiply1.outputs["Vector"], set_position1.inputs["Position"])
# Clamp -> Noise Texture
links.new(clamp.outputs["Result"], noise.inputs["Roughness"])
# Noise Texture -> Multiply 2
links.new(noise.outputs["Fac"], multiply2.inputs[1])
# Position 2 -> Multiply 2
links.new(position2.outputs["Position"], multiply2.inputs[0])
# Multiply 2 -> Set Position 2
links.new(multiply2.outputs["Vector"], set_position2.inputs["Position"])
# Set Position 1 -> Set Position 2
links.new(set_position1.outputs["Geometry"], set_position2.inputs["Geometry"])
# Set Position 2 -> Set Shade Smooth
links.new(set_position2.outputs["Geometry"], set_shade_smooth.inputs["Geometry"])
# Set Shade Smooth -> Set Material
links.new(set_shade_smooth.outputs["Geometry"], set_material.inputs["Geometry"])
# Set Material -> Group Output
links.new(set_material.outputs["Geometry"], group_output.inputs["Geometry"])
print(f"Rock Geometry Nodes グループ '{geometry_name}' が正常に作成されました。")
return node_group
def create_rock_object(name="Rock", location=(0, 0, 0), random_shape_value=None, custom_params=None):
"""
岩石オブジェクトを作成する関数
Args:
name: オブジェクト名
location: オブジェクトの位置
random_shape_value: Random Shapeの値(Noneの場合はランダム)
custom_params: カスタムパラメータの辞書
Returns:
作成されたオブジェクト
"""
# ICO球を作成
bpy.ops.mesh.primitive_ico_sphere_add(subdivisions=2, location=location)
obj = bpy.context.active_object
obj.name = name
# マテリアルを作成・割り当て
#mat = create_rock_material(name=name)
#if len(obj.data.materials) == 0:
# obj.data.materials.append(mat)
#else:
# obj.data.materials[0] = mat
# Random Shapeの値を設定
if random_shape_value is None:
random_shape_value = random.uniform(0.1, 5.0)
# パラメータを準備
params = {
"Random Shape": random_shape_value,
#"Material": mat
}
# カスタムパラメータがあればマージ
if custom_params:
params.update(custom_params)
# ジオメトリーノードグループを作成(パラメータ付き)
create_rock_geometry_nodes(geometry_name=name, params=params)
# ジオメトリーノードモディファイアを追加
modifier = obj.modifiers.new(name=name, type='NODES')
modifier.node_group = bpy.data.node_groups[name]
return obj
def rock_array_generator(
count=10,
pos_min=(0, 0, 0),
pos_max=(10, 10, 0),
apply=False,
array_pos="random",
group_input_params=None,
positions=None,
base_name="Rock"
):
"""
岩石配列を生成する関数
Args:
count: 生成する岩石の数
pos_min: 位置の最小値 (x0, y0, z0)
pos_max: 位置の最大値 (x1, y1, z1)
apply: モディファイアを適用するかどうか
array_pos: 配置方法 ("grid" または "random")
group_input_params: ジオメトリーノードのパラメータ(辞書形式)
Returns:
生成された岩石オブジェクトのリスト
"""
# デフォルトパラメータ
default_params = {
"Rock Sub-surf": 3,
"Detail Sub-surf": 2,
"Rock Edges Size": 1,
"Edge Crease": 1,
"Edge Smoothness": 0,
"Rock Scale": (1, 1, 1),
"Detail Scale": 0,
"Noise Scale": 0.3,
"Detail": 15,
"Roughness": 0.6,
"Distortion": 0
}
# パラメータをマージ
if group_input_params:
default_params.update(group_input_params)
# マテリアルを作成
mat = create_rock_material(f"{base_name}_material")
if not positions:
positions = []
if array_pos == "grid":
# グリッド配置の計算
grid_size = math.ceil(math.pow(count, 1/3))
x_step = (pos_max[0] - pos_min[0]) / max(grid_size - 1, 1)
y_step = (pos_max[1] - pos_min[1]) / max(grid_size - 1, 1)
z_step = (pos_max[2] - pos_min[2]) / max(grid_size - 1, 1)
rock_index = 0
for i in range(grid_size):
for j in range(grid_size):
for k in range(grid_size):
if rock_index >= count:
break
x = pos_min[0] + i * x_step
y = pos_min[1] + j * y_step
z = pos_min[2] + k * z_step
positions.append([x,y,z])
rock_index += 1
if rock_index >= count:
break
if rock_index >= count:
break
else: # random配置
for i in range(count):
# ランダムな位置を生成
x = random.uniform(pos_min[0], pos_max[0])
y = random.uniform(pos_min[1], pos_max[1])
z = random.uniform(pos_min[2], pos_max[2])
positions.append([x,y,z])
rocks = []
for i, position in enumerate(positions):
name = f"{base_name}_{i:03d}"
# Random Shapeの値をランダムに設定
random_shape = random.uniform(0.1, 5.0)
# 各岩石用のパラメータを準備
rock_params = default_params.copy()
rock_params["Random Shape"] = random_shape
rock_params["Material"] = mat
# 岩石を作成(パラメータを渡す)
rock = create_rock_object(
name=name,
location=(position[0], position[1], position[2]),
random_shape_value=random_shape,
custom_params=rock_params
)
# モディファイアを適用
if apply:
bpy.context.view_layer.objects.active = rock
bpy.ops.object.modifier_apply(modifier=name)
rocks.append(rock)
print(f"{count}個の岩石を生成しました。")
return rocks
# シーンをクリア(オプション - 必要に応じてコメントアウト)
def clear_scene():
"""既存のメッシュオブジェクトを削除"""
bpy.ops.object.select_all(action='SELECT')
bpy.ops.object.delete(use_global=False)
import bpy
import math
def setup_scene(
plane_size=20,
plane_location=(0, 0, 0),
plane_subdivisions=10,
sun_location=(5, -5, 10),
sun_rotation=(math.radians(45), math.radians(30), 0),
sun_energy=2.0,
camera_location=(10, -10, 8),
camera_rotation=(math.radians(70), 0, math.radians(45)),
camera_focal_length=35,
camera_target_location=(0, 0, 1),
use_look_at=True,
add_plane_material=True
):
"""
シーンに平面、サンライト、カメラをセットアップする関数
Args:
plane_size: 平面のサイズ(デフォルト: 20)
plane_location: 平面の位置(デフォルト: (0, 0, 0))
plane_subdivisions: 平面の分割数(デフォルト: 10)
sun_location: サンライトの位置(デフォルト: (5, -5, 10))
sun_rotation: サンライトの回転(ラジアン)(デフォルト: (45°, 30°, 0°))
sun_energy: サンライトの強度(デフォルト: 2.0)
camera_location: カメラの位置(デフォルト: (10, -10, 8))
camera_rotation: カメラの回転(ラジアン)(デフォルト: (70°, 0°, 45°))
camera_focal_length: カメラの焦点距離(mm)(デフォルト: 35)
camera_target_location: カメラのターゲット位置(use_look_at=Trueの場合)
use_look_at: カメラをターゲットに向けるか(デフォルト: True)
add_plane_material: 平面にマテリアルを追加するか(デフォルト: True)
Returns:
dict: 作成されたオブジェクトの辞書 {'plane': plane, 'sun': sun, 'camera': camera}
"""
# === 平面(地面)の作成 ===
bpy.ops.mesh.primitive_plane_add(
size=plane_size,
location=plane_location,
enter_editmode=False
)
plane = bpy.context.active_object
plane.name = "Ground_Plane"
# 平面を細分化(よりリアルな影を作るため)
if plane_subdivisions > 0:
# エディットモードに入る
bpy.context.view_layer.objects.active = plane
bpy.ops.object.mode_set(mode='EDIT')
bpy.ops.mesh.select_all(action='SELECT')
# 細分化
bpy.ops.mesh.subdivide(number_cuts=plane_subdivisions)
# オブジェクトモードに戻る
bpy.ops.object.mode_set(mode='OBJECT')
# 平面にマテリアルを追加(オプション)
if add_plane_material:
mat = bpy.data.materials.new(name="Ground_Material")
mat.use_nodes = True
# ノードを取得
nodes = mat.node_tree.nodes
bsdf = nodes.get("Principled BSDF")
if bsdf:
# 地面っぽい色に設定(グレー系)
bsdf.inputs['Base Color'].default_value = (0.9, 0.9, 0.9, 1.0)
bsdf.inputs['Roughness'].default_value = 0.4
bsdf.inputs['Metallic'].default_value = 0.2
# マテリアルを平面に割り当て
if len(plane.data.materials) == 0:
plane.data.materials.append(mat)
else:
plane.data.materials[0] = mat
# === サンライトの作成 ===
# 既存のライトを削除(オプション - 必要に応じて)
for obj in bpy.data.objects:
if obj.type == 'LIGHT' and obj.name != "Sun_Light":
bpy.data.objects.remove(obj, do_unlink=True)
# サンライトを追加
bpy.ops.object.light_add(
type='SUN',
location=sun_location
)
sun = bpy.context.active_object
sun.name = "Sun_Light"
sun.rotation_euler = sun_rotation
# サンライトの設定
sun.data.energy = sun_energy
sun.data.angle = math.radians(2) # ソフトシャドウのための角度
# === カメラの作成 ===
# 既存のカメラを削除(オプション - 必要に応じて)
for obj in bpy.data.objects:
if obj.type == 'CAMERA' and obj.name != "Scene_Camera":
bpy.data.objects.remove(obj, do_unlink=True)
# カメラを追加
bpy.ops.object.camera_add(location=camera_location)
camera = bpy.context.active_object
camera.name = "Scene_Camera"
# カメラをターゲットに向ける(オプション)
if use_look_at:
# カメラの向きを計算
direction = [
camera_target_location[0] - camera_location[0],
camera_target_location[1] - camera_location[1],
camera_target_location[2] - camera_location[2]
]
# 方向ベクトルから回転を計算
rot_quat = direction_to_rotation(direction)
camera.rotation_euler = rot_quat.to_euler()
else:
camera.rotation_euler = camera_rotation
# カメラの設定
camera.data.lens = camera_focal_length
camera.data.clip_start = 0.1
camera.data.clip_end = 1000
# シーンのアクティブカメラに設定
bpy.context.scene.camera = camera
# === レンダリング設定(オプション)===
# Eeveeの設定(より高品質な影のため)
#bpy.context.scene.eevee.use_soft_shadows = True
#bpy.context.scene.eevee.shadow_cube_size = '2048'
#bpy.context.scene.eevee.shadow_cascade_size = '2048'
# アンビエントオクルージョンを有効化
#bpy.context.scene.eevee.use_gtao = True
#bpy.context.scene.eevee.gtao_distance = 0.2
#bpy.context.scene.eevee.gtao_factor = 1.0
print("シーンセットアップが完了しました:")
print(f" - 平面: {plane.name} (サイズ: {plane_size})")
print(f" - サンライト: {sun.name} (強度: {sun_energy})")
print(f" - カメラ: {camera.name} (焦点距離: {camera_focal_length}mm)")
return {
'plane': plane,
'sun': sun,
'camera': camera
}
def direction_to_rotation(direction):
"""
方向ベクトルから回転クォータニオンを計算するヘルパー関数
Args:
direction: 方向ベクトル [x, y, z]
Returns:
Quaternion: 回転クォータニオン
"""
import mathutils
# 方向ベクトルを正規化
direction = mathutils.Vector(direction).normalized()
# デフォルトのカメラの向き(-Z方向)
default_direction = mathutils.Vector((0, 0, -1))
# 回転を計算
rotation = default_direction.rotation_difference(direction)
return rotation
def voronoi_partition_3d(space_bounds, initial_points=None, target_nodes=10,
merge_threshold=None, periodic=True, return_voronoi=False):
"""
3次元空間をボロノイ分割し、近いノードをマージして指定ノード数以下にする
周期境界条件を適用可能
Parameters:
-----------
space_bounds : list or array
[[x_min, y_min, z_min], [x_max, y_max, z_max]]の形式
initial_points : int or array, optional
初期点の数(int)または初期点の座標(array)
Noneの場合はtarget_nodes * 3の点を生成
target_nodes : int
最終的なノード数の目標値
merge_threshold : float, optional
マージする距離の閾値(Noneの場合は自動計算)
periodic : bool
周期境界条件を適用するか
return_voronoi : bool
Voronoiオブジェクトも返すかどうか
Returns:
--------
dict : 以下のキーを含む辞書
'nodes': 最終的なノード(母点)の座標 (n_nodes, 3)
'vertices': ボロノイ頂点の座標 (n_vertices, 3)
'regions': 各ノードに対応する頂点のインデックスリスト
'voronoi': Voronoiオブジェクト(return_voronoi=Trueの場合)
"""
# 空間の境界を設定
bounds = np.array(space_bounds)
mins = bounds[0] # [x_min, y_min, z_min]
maxs = bounds[1] # [x_max, y_max, z_max]
box_size = maxs - mins
# 初期点の生成
if initial_points is None:
n_initial = target_nodes * 3 # 目標の3倍の点から開始
points = np.random.uniform(mins, maxs, (n_initial, 3))
elif isinstance(initial_points, int):
points = np.random.uniform(mins, maxs, (initial_points, 3))
else:
points = np.array(initial_points)
# 現在のノード数が目標以下ならマージ不要
if len(points) <= target_nodes:
merged_points = points
else:
# ノードをマージ(周期境界条件を考慮)
if periodic:
merged_points = merge_nodes_distance_periodic(
points, target_nodes, box_size, merge_threshold
)
else:
merged_points = merge_nodes_distance(
points, target_nodes, merge_threshold
)
# 周期境界条件でボロノイ分割
if periodic:
# 隣接セルにノードを複製
extended_points = replicate_points_periodic(merged_points, box_size)
# 拡張された点群でボロノイ分割
vor = Voronoi(extended_points)
# original cell内の頂点とノードのみを抽出
result = extract_original_cell(
vor, merged_points, mins, maxs,
len(merged_points), return_voronoi
)
else:
# 通常のボロノイ分割
vor = Voronoi(merged_points)
# 有限な領域のみを抽出
finite_regions = []
for region in vor.regions:
if len(region) > 0 and -1 not in region:
finite_regions.append(region)
result = {
'nodes': merged_points,
'vertices': vor.vertices,
'regions': finite_regions
}
if return_voronoi:
result['voronoi'] = vor
return result
def merge_nodes_distance(points, target_nodes, merge_threshold=None):
"""
距離ベースでノードを段階的にマージ
Parameters:
-----------
points : array of shape (n_points, 3)
マージ対象の点群
target_nodes : int
目標ノード数
merge_threshold : float, optional
マージの距離閾値
Returns:
--------
array : マージ後の点群
"""
points = points.copy()
while len(points) > target_nodes:
n_points = len(points)
# 全点間の距離を計算
min_dist = float('inf')
min_i, min_j = 0, 1
for i in range(n_points):
for j in range(i+1, n_points):
dist = np.linalg.norm(points[i] - points[j])
if dist < min_dist:
min_dist = dist
min_i, min_j = i, j
# 閾値チェック
if merge_threshold is not None and min_dist > merge_threshold:
break
# 2点の重心を新しい点とする
new_point = (points[min_i] + points[min_j]) / 2
# 古い点を削除し、新しい点を追加
points = np.delete(points, [min_i, min_j], axis=0)
points = np.vstack([points, new_point])
return points
def merge_nodes_distance_periodic(points, target_nodes, box_size, merge_threshold=None):
"""
周期境界条件を考慮した距離ベースのマージ
Parameters:
-----------
points : array of shape (n_points, 3)
マージ対象の点群
target_nodes : int
目標ノード数
box_size : array of shape (3,)
ボックスのサイズ [Lx, Ly, Lz]
merge_threshold : float, optional
マージの距離閾値
Returns:
--------
array : マージ後の点群
"""
points = points.copy()
while len(points) > target_nodes:
n_points = len(points)
# 全点間の最小画像距離を計算
min_dist = float('inf')
min_i, min_j = 0, 1
for i in range(n_points):
for j in range(i+1, n_points):
# 周期境界を考慮した最小画像距離
dist = periodic_distance(points[i], points[j], box_size)
if dist < min_dist:
min_dist = dist
min_i, min_j = i, j
# 閾値チェック
if merge_threshold is not None and min_dist > merge_threshold:
break
# 周期境界を考慮した重心計算
new_point = periodic_mean(points[min_i], points[min_j], box_size)
# 古い点を削除し、新しい点を追加
points = np.delete(points, [min_i, min_j], axis=0)
points = np.vstack([points, new_point])
return points
def periodic_distance(p1, p2, box_size):
"""
周期境界条件下での最小画像距離を計算
Parameters:
-----------
p1, p2 : array of shape (3,)
2点の座標
box_size : array of shape (3,)
ボックスのサイズ
Returns:
--------
float : 最小画像距離
"""
delta = p2 - p1
# 各軸で最小画像を選択
delta = delta - box_size * np.round(delta / box_size)
return np.linalg.norm(delta)
def periodic_mean(p1, p2, box_size):
"""
周期境界条件下での2点の重心を計算
Parameters:
-----------
p1, p2 : array of shape (3,)
2点の座標
box_size : array of shape (3,)
ボックスのサイズ
Returns:
--------
array : 重心座標
"""
# p1を基準にp2の最小画像を取得
delta = p2 - p1
delta = delta - box_size * np.round(delta / box_size)
p2_image = p1 + delta
# 重心を計算
mean = (p1 + p2_image) / 2
# ボックス内に収める
mean = mean - box_size * np.floor(mean / box_size)
return mean
def replicate_points_periodic(points, box_size):
"""
周期境界条件のため、隣接する26セル(3x3x3-1)にノードを複製
Parameters:
-----------
points : array of shape (n_points, 3)
元のノード座標
box_size : array of shape (3,)
ボックスのサイズ
Returns:
--------
array : 拡張されたノード座標
"""
extended_points = []
# 3x3x3の格子点を生成
for dx in [-1, 0, 1]:
for dy in [-1, 0, 1]:
for dz in [-1, 0, 1]:
# シフトベクトル
shift = np.array([dx, dy, dz]) * box_size
# シフトした点群を追加
shifted_points = points + shift
extended_points.append(shifted_points)
# 全ての点を結合
extended_points = np.vstack(extended_points)
return extended_points
def extract_original_cell(vor, original_nodes, mins, maxs, n_original, return_voronoi):
"""
拡張されたボロノイ図からoriginal cell内の頂点とノードを抽出
Parameters:
-----------
vor : Voronoi object
拡張された点群のボロノイ図
original_nodes : array
元のノード座標
mins, maxs : array
original cellの境界
n_original : int
元のノード数
return_voronoi : bool
Voronoiオブジェクトを返すか
Returns:
--------
dict : ノード、頂点、領域の情報
"""
# original cell内の頂点を抽出
vertices_in_cell = []
vertex_mapping = {} # 元のインデックス -> 新しいインデックス
for i, vertex in enumerate(vor.vertices):
# 頂点がoriginal cell内にあるかチェック(境界を含む)
if np.all(vertex >= mins - 1e-10) and np.all(vertex <= maxs + 1e-10):
vertex_mapping[i] = len(vertices_in_cell)
vertices_in_cell.append(vertex)
vertices_in_cell = np.array(vertices_in_cell)
# 中心のセル(original)のノードに対応する領域を抽出
regions = []
for i in range(n_original):
# 中心セルのノードiに対応するボロノイ領域
region = vor.regions[vor.point_region[i]]
# original cell内の頂点のみを含む領域に変換
new_region = []
for vertex_idx in region:
if vertex_idx in vertex_mapping:
new_region.append(vertex_mapping[vertex_idx])
if len(new_region) > 0:
regions.append(new_region)
result = {
'nodes': original_nodes,
'vertices': vertices_in_cell,
'regions': regions
}
if return_voronoi:
result['voronoi'] = vor
return result
def get_neighboring_nodes_periodic(result, box_size):
"""
周期境界条件下での隣接ノードのペアを取得
Parameters:
-----------
result : dict
voronoi_partition_3d関数の戻り値
box_size : array of shape (3,)
ボックスのサイズ
Returns:
--------
list : 隣接ノードのインデックスペアと最小画像距離 [(i, j, dist), ...]
"""
nodes = result['nodes']
n_nodes = len(nodes)
neighbors = []
# 各ノードペアについて、ボロノイ領域が隣接しているかチェック
for i in range(n_nodes):
for j in range(i+1, n_nodes):
# 領域が共有頂点を持つか確認
if 'regions' in result and i < len(result['regions']) and j < len(result['regions']):
region_i = set(result['regions'][i])
region_j = set(result['regions'][j])
# 共有頂点があれば隣接
if region_i & region_j:
dist = periodic_distance(nodes[i], nodes[j], box_size)
neighbors.append((i, j, dist))
return neighbors
def visualize_voronoi_3d(result, show_nodes=True, show_vertices=True,
show_edges=False, node_size=50, vertex_size=20,
space_bounds=None):
"""
3Dボロノイ分割の結果を可視化
Parameters:
-----------
result : dict
voronoi_partition_3d関数の戻り値
show_nodes : bool
ノード(母点)を表示するか
show_vertices : bool
頂点を表示するか
show_edges : bool
ボロノイ図の稜線を表示するか
node_size : int
ノードの表示サイズ
vertex_size : int
頂点の表示サイズ
space_bounds : list, optional
空間の境界 [[x_min, y_min, z_min], [x_max, y_max, z_max]]
"""
import matplotlib.pyplot as plt
from mpl_toolkits.mplot3d import Axes3D
fig = plt.figure(figsize=(12, 9))
ax = fig.add_subplot(111, projection='3d')
# ノードの表示
if show_nodes:
nodes = result['nodes']
ax.scatter(nodes[:, 0], nodes[:, 1], nodes[:, 2],
c='red', s=node_size, alpha=0.8,
edgecolors='darkred', linewidths=1,
label=f'Nodes ({len(nodes)})')
# 頂点の表示
if show_vertices:
vertices = result['vertices']
ax.scatter(vertices[:, 0], vertices[:, 1], vertices[:, 2],
c='blue', s=vertex_size, alpha=0.5,
label=f'Vertices ({len(vertices)})')
# ボックスの枠を描画
if space_bounds is not None:
bounds = np.array(space_bounds)
mins = bounds[0]
maxs = bounds[1]
# ボックスの辺を描画
box_edges = [
[[mins[0], mins[1], mins[2]], [maxs[0], mins[1], mins[2]]],
[[mins[0], mins[1], mins[2]], [mins[0], maxs[1], mins[2]]],
[[mins[0], mins[1], mins[2]], [mins[0], mins[1], maxs[2]]],
[[maxs[0], maxs[1], maxs[2]], [mins[0], maxs[1], maxs[2]]],
[[maxs[0], maxs[1], maxs[2]], [maxs[0], mins[1], maxs[2]]],
[[maxs[0], maxs[1], maxs[2]], [maxs[0], maxs[1], mins[2]]],
[[mins[0], maxs[1], mins[2]], [maxs[0], maxs[1], mins[2]]],
[[mins[0], maxs[1], mins[2]], [mins[0], maxs[1], maxs[2]]],
[[maxs[0], mins[1], mins[2]], [maxs[0], maxs[1], mins[2]]],
[[maxs[0], mins[1], mins[2]], [maxs[0], mins[1], maxs[2]]],
[[mins[0], mins[1], maxs[2]], [maxs[0], mins[1], maxs[2]]],
[[mins[0], mins[1], maxs[2]], [mins[0], maxs[1], maxs[2]]],
]
for edge in box_edges:
edge = np.array(edge)
ax.plot3D(edge[:, 0], edge[:, 1], edge[:, 2], 'k-', alpha=0.3, linewidth=1)
# 軸の範囲を設定
margin = 0.5
ax.set_xlim([mins[0]-margin, maxs[0]+margin])
ax.set_ylim([mins[1]-margin, maxs[1]+margin])
ax.set_zlim([mins[2]-margin, maxs[2]+margin])
ax.set_xlabel('X')
ax.set_ylabel('Y')
ax.set_zlabel('Z')
ax.legend()
ax.grid(True, alpha=0.3)
plt.title(f"3D Voronoi Partition (Periodic Boundary)")
plt.show()
# 使用例
#------delete all------#
clear_scene()
#------make plane, light, and camera------#
setup_scene(
plane_size=30,
plane_location=(0, 0, -0.5),
plane_subdivisions=5,
sun_location=(10, -8, 15),
sun_rotation=(math.radians(50), math.radians(25), 0),
sun_energy=3.0,
camera_location=(12, -12, 10),
camera_focal_length=50,
camera_target_location=(0, 0, 1),
use_look_at=True,
add_plane_material=True
)
####################
# composite electrode
####################
#------make-uniform-positions (Voronoi)------#
# 空間の定義: [[x_min, y_min, z_min], [x_max, y_max, z_max]]
space_bounds = [[0, 0, 0], [4, 4, 2.5]]
# ボロノイ分割を実行(30個の初期点から10個にマージ)
result = voronoi_partition_3d(
space_bounds=space_bounds,
initial_points=300, # 30個の初期点
target_nodes=200, # 10個まで削減
periodic=False, # 周期境界条件を適用
return_voronoi=True
)
# voronoi_nodes for positions
# vertices for interstitial something
voronoi_nodes = result['nodes']
voronoi_vertices = result['vertices']
positions_A, positions_B, positions_C = [], [], []
# assign particle A and B with 50 %
for node in voronoi_nodes:
if random.random() > 0.5:
positions_A.append(node)
else:
positions_B.append(node)
# carbon additive
zrange = (space_bounds[1][2]-space_bounds[0][2])/50
for vertex in voronoi_vertices:
if space_bounds[0][0] <= vertex[0] <= space_bounds[1][0] and \
space_bounds[0][1] <= vertex[1] <= space_bounds[1][1] and \
space_bounds[0][2] <= vertex[2] <= space_bounds[1][2] :
for i in range(2):
add_vertex = vertex.copy()
positions_C.append(add_vertex)
vertex+=np.array([random.uniform(-zrange, zrange), random.uniform(-zrange, zrange), random.uniform(-zrange, zrange)])
#------rock parameter------#
custom_params = {
"Rock Sub-surf": 1,
"Detail Sub-surf": 1,
"Rock Edges Size": 1,
"Edge Crease": 1,
"Edge Smoothness": 0,
"Rock Scale": (1, 1, 1),
"Detail Scale": 0,
"Noise Scale": 0.4,
"Detail": 15,
"Roughness": 0.6,
"Distortion": 0
}
rocks = rock_array_generator(
base_name='RockA',
apply=True, #fix the modifier (light)
group_input_params=custom_params, #params for rock geometry
positions = positions_A
)
#------rock parameter------#
custom_params = {
"Rock Sub-surf": 1,
"Detail Sub-surf": 1,
"Rock Edges Size": 1,
"Edge Crease": 1,
"Edge Smoothness": 0,
"Rock Scale": (0.8, 0.8, 0.8),
"Detail Scale": 0,
"Noise Scale": 0.4,
"Detail": 15,
"Roughness": 0.6,
"Distortion": 0
}
rocks = rock_array_generator(
base_name='RockB',
apply=True, #fix the modifier (light)
group_input_params=custom_params, #params for rock geometry
positions = positions_B
)
#------rock parameter------#
custom_params = {
"Rock Sub-surf": 1,
"Detail Sub-surf": 1,
"Rock Edges Size": 1,
"Edge Crease": 1,
"Edge Smoothness": 0,
"Rock Scale": (0.2, 0.2, 0.2),
"Detail Scale": 0,
"Noise Scale": 0.4,
"Detail": 1,
"Roughness": 0.6,
"Distortion": 0
}
rocks = rock_array_generator(
base_name='RockC',
apply=True, #fix the modifier (light)
group_input_params=custom_params, #params for rock geometry
positions = positions_C
)
####################
# solid electrolyte
####################
#------make-uniform-positions (Voronoi)------#
# 空間の定義: [[x_min, y_min, z_min], [x_max, y_max, z_max]]
space_bounds = [[0, 0, 2.5], [4, 4, 4]]
# ボロノイ分割を実行(30個の初期点から10個にマージ)
result = voronoi_partition_3d(
space_bounds=space_bounds,
initial_points=300, # 30個の初期点
target_nodes=200, # 10個まで削減
periodic=False, # 周期境界条件を適用
return_voronoi=True
)
# voronoi_nodes for positions
# vertices for interstitial something
voronoi_nodes = result['nodes']
voronoi_vertices = result['vertices']
positions_A, positions_B, positions_C = [], [], []
for node in voronoi_nodes:
positions_A.append(node)
#------rock parameter------#
custom_params = {
"Rock Sub-surf": 1,
"Detail Sub-surf": 1,
"Rock Edges Size": 1,
"Edge Crease": 1,
"Edge Smoothness": 0,
"Rock Scale": (1, 1, 1),
"Detail Scale": 0,
"Noise Scale": 0.4,
"Detail": 15,
"Roughness": 0.6,
"Distortion": 0
}
rocks = rock_array_generator(
base_name='RockA',
apply=True, #fix the modifier (light)
group_input_params=custom_params, #params for rock geometry
positions = positions_A
)
####################
# top electrode
####################
#------make-uniform-positions (Voronoi)------#
# 空間の定義: [[x_min, y_min, z_min], [x_max, y_max, z_max]]
space_bounds = [[0, 0, 4], [4, 4, 4.5]]
# ボロノイ分割を実行(30個の初期点から10個にマージ)
result = voronoi_partition_3d(
space_bounds=space_bounds,
initial_points=100, # 30個の初期点
target_nodes=40, # 10個まで削減
periodic=False, # 周期境界条件を適用
return_voronoi=True
)
# voronoi_nodes for positions
# vertices for interstitial something
voronoi_nodes = result['nodes']
voronoi_vertices = result['vertices']
positions_A, positions_B, positions_C = [], [], []
# assign particle A and B with 50 %
for node in voronoi_nodes:
if random.random() > 0.2:
positions_A.append(node)
else:
positions_B.append(node)
#------rock parameter------#
custom_params = {
"Rock Sub-surf": 2,
"Detail Sub-surf": 2,
"Rock Edges Size": 1,
"Edge Crease": 1,
"Edge Smoothness": 0,
"Rock Scale": (0.5, 0.5, 0.5),
"Detail Scale": 0,
"Noise Scale": 0.4,
"Detail": 15,
"Roughness": 0.6,
"Distortion": 0
}
rocks = rock_array_generator(
base_name='RockD',
apply=True, #fix the modifier (light)
group_input_params=custom_params, #params for rock geometry
positions = positions_A
)
"""
#------or you can make Rock manually------#
custom_params = {
"Rock Sub-surf": 3,
"Detail Sub-surf": 3,
"Rock Edges Size": 1,
"Edge Crease": 1,
"Edge Smoothness": 0,
"Rock Scale": (1, 1, 1),
"Detail Scale": 0,
"Noise Scale": 0.4,
"Detail": 15,
"Roughness": 0.6,
"Distortion": 0
}
rocks = rock_array_generator(
count=1, #num of rock
pos_min=(-2, -2, 0), #start coordinate
pos_max=(2, 2, 1.5), #end conordinate
array_pos="random", #random or array for positions
apply=False, #fix the modifier (light)
group_input_params=custom_params, #params for rock geometry
)
"""6. 結晶構造の原子・多面体の色をグループ化して一括変更するコード
コードを表示(python、197行)
import bpy
import re
from collections import defaultdict
import math

def colors_are_similar(c1, c2, threshold=0.01):
    """
    2つの色が似ているか判定(RGB距離で判定)
    """
    distance = math.sqrt(sum((c1[i] - c2[i]) ** 2 for i in range(3)))
    return distance < threshold

def create_or_get_collection(name, parent_collection=None):
    """
    コレクションを作成または取得
    """
    if name in bpy.data.collections:
        return bpy.data.collections[name]

    new_collection = bpy.data.collections.new(name)

    # 親コレクションに追加(なければSceneコレクションに追加)
    if parent_collection:
        parent_collection.children.link(new_collection)
    else:
        bpy.context.scene.collection.children.link(new_collection)

    return new_collection

def merge_similar_colors(threshold=0.01):
    """
    似た色も含めてマージし、コレクションに整理する版
    """
    search_patterns = [
        r'^Shape_IndexedFaceSet(?:\.\d+)?$',
        r'^Shape_Cylinder(?:\.\d+)?$',
        r'^atom\d+_IndexedFaceSet(?:\.\d+)?$'
    ]
    names = ['Shape', 'Cylinder', 'Atom']

    print(f"=== 類似色のマージとコレクション整理 (閾値: {threshold}) ===")

    # メインコレクションを作成
    main_collection = create_or_get_collection("Material_Groups")

    # パターンごとに処理
    for search_pattern, name in zip(search_patterns, names):
        color_representatives = {}  # 代表色とそのグループ

        # パターン用の親コレクションを作成
        pattern_collection = create_or_get_collection(f"{name}_Materials", main_collection)

        print(f"\n--- {name}パターンの処理 ---")

        # Step 1: オブジェクトとマテリアルを収集
        for obj in bpy.data.objects:
            if not re.match(search_pattern, obj.name):
                continue

            if obj.type != 'MESH' or not obj.material_slots:
                continue

            for slot_index, slot in enumerate(obj.material_slots):
                mat = slot.material
                if not mat or not mat.use_nodes:
                    continue

                # 色を取得
                for node in mat.node_tree.nodes:
                    if node.type == 'BSDF_PRINCIPLED':
                        color = node.inputs['Base Color'].default_value
                        color_tuple = (color[0], color[1], color[2], color[3])

                        # 似た色のグループを探す
                        found_group = False
                        for rep_color in color_representatives:
                            if colors_are_similar(color_tuple, rep_color, threshold):
                                color_representatives[rep_color]['materials'].add(mat.name)
                                color_representatives[rep_color]['objects'].append({
                                    'obj': obj,
                                    'slot_index': slot_index,
                                    'original_mat': mat
                                })
                                found_group = True
                                break

                        # 新しい色グループを作成
                        if not found_group:
                            color_representatives[color_tuple] = {
                                'materials': {mat.name},
                                'objects': [{
                                    'obj': obj,
                                    'slot_index': slot_index,
                                    'original_mat': mat
                                }]
                            }
                        break

        print(f"見つかった{name}の色グループ: {len(color_representatives)}")

        # Step 2: マージと適用、コレクションに整理
        for color_index, (rep_color, group_data) in enumerate(color_representatives.items()):
            master_mat_name = f"{name}_Color_{color_index + 1:03d}"

            # マスターマテリアルを作成
            if master_mat_name in bpy.data.materials:
                master_mat = bpy.data.materials[master_mat_name]
            else:
                master_mat = bpy.data.materials.new(name=master_mat_name)
                master_mat.use_nodes = True
                bsdf = master_mat.node_tree.nodes.get("Principled BSDF")
                if bsdf:
                    bsdf.inputs['Base Color'].default_value = rep_color
                    bsdf.inputs['Roughness'].default_value = 0.5
                    bsdf.inputs['Metallic'].default_value = 0.0

            # このマテリアル用のコレクションを作成
            material_collection = create_or_get_collection(master_mat_name, pattern_collection)

            # 処理済みオブジェクトのセット(重複を避けるため)
            processed_objects = set()

            # マテリアルを適用し、オブジェクトをコレクションに移動
            for item in group_data['objects']:
                obj = item['obj']
                slot_index = item['slot_index']

                # マテリアルを適用
                if slot_index < len(obj.data.materials):
                    obj.data.materials[slot_index] = master_mat

                # オブジェクトをコレクションに移動(まだ処理していない場合)
                if obj.name not in processed_objects:
                    # 既存のコレクションから削除
                    for coll in obj.users_collection:
                        coll.objects.unlink(obj)

                    # 新しいコレクションに追加
                    material_collection.objects.link(obj)
                    processed_objects.add(obj.name)

            print(f"  {master_mat_name}: {len(processed_objects)} オブジェクト")

    # Step 3: クリーンアップ
    print("\n--- クリーンアップ ---")
    removed_materials = []
    for mat in list(bpy.data.materials):
        if mat.users == 0:
            removed_materials.append(mat.name)
            bpy.data.materials.remove(mat)

    print(f"削除されたマテリアル数: {len(removed_materials)}")

    # 統計情報
    print("\n=== 完了 ===")
    print("コレクション構造:")
    print("└─ Material_Groups")

    for name in names:
        pattern_coll_name = f"{name}_Materials"
        if pattern_coll_name in bpy.data.collections:
            pattern_coll = bpy.data.collections[pattern_coll_name]
            child_count = len(pattern_coll.children)
            if child_count > 0:
                print(f"   └─ {pattern_coll_name} ({child_count} 色グループ)")
                for child in pattern_coll.children:
                    obj_count = len(child.objects)
                    print(f"      └─ {child.name} ({obj_count} オブジェクト)")

# 実行前のオプション:既存のMaterial_Groupsコレクションを削除
def cleanup_existing_collections():
    """既存のコレクションをクリーンアップ"""
    if "Material_Groups" in bpy.data.collections:
        collection = bpy.data.collections["Material_Groups"]

        # すべてのオブジェクトをSceneコレクションに戻す
        def move_objects_to_scene(coll):
            for obj in list(coll.objects):
                for c in obj.users_collection:
                    c.objects.unlink(obj)
                bpy.context.scene.collection.objects.link(obj)
            for child in coll.children:
                move_objects_to_scene(child)

        move_objects_to_scene(collection)

        # コレクションを削除
        bpy.data.collections.remove(collection)
        print("既存のMaterial_Groupsコレクションを削除しました")

# メイン実行
if __name__ == "__main__":
    # オプション:既存のコレクションをクリーンアップ(必要に応じてコメントアウト)
    cleanup_existing_collections()

    # マテリアルのマージとコレクション整理を実行
    merge_similar_colors(threshold=0.01)
7. wrlファイルからfbxファイルへの変換
コードを表示(python、250行)
import bpy
import os
import sys
import math
import re
from pathlib import Path
import importlib.util

# 外部スクリプトのインポート
def import_merge_script():
    """merge_same_color_mesh.pyモジュールを動的にインポート"""
    script_path = "/Users/ryojikanno/Blender/scripts/merge_same_color_mesh.py"
    spec = importlib.util.spec_from_file_location("merge_same_color_mesh", script_path)
    merge_module = importlib.util.module_from_spec(spec)
    spec.loader.exec_module(merge_module)
    return merge_module

def clear_scene():
    """シーンの全オブジェクトとコレクションを削除"""
    # 全オブジェクトを選択して削除
    bpy.ops.object.select_all(action='SELECT')
    bpy.ops.object.delete(use_global=False)

    # 全コレクションを削除
    for collection in bpy.data.collections:
        bpy.data.collections.remove(collection)

    # メッシュデータを削除
    for mesh in bpy.data.meshes:
        bpy.data.meshes.remove(mesh)

    # マテリアルを削除
    for material in bpy.data.materials:
        bpy.data.materials.remove(material)

    # カーブを削除
    for curve in bpy.data.curves:
        bpy.data.curves.remove(curve)

    # ライトを削除
    for light in bpy.data.lights:
        bpy.data.lights.remove(light)

    # カメラを削除
    for camera in bpy.data.cameras:
        bpy.data.cameras.remove(camera)

def import_wrl_file(filepath):
    """WRLファイルをインポート"""
    try:
        # X3D/WRLインポーターを使用
        bpy.ops.import_scene.x3d(filepath=filepath)

        # インポート直後に全オブジェクトを表示状態にする
        for obj in bpy.data.objects:
            obj.hide_set(False)
            obj.hide_viewport = False

        print(f"Successfully imported: {filepath}")
        print(f"Total objects in scene: {len(bpy.data.objects)}")
        return True
    except Exception as e:
        print(f"Error importing {filepath}: {e}")
        return False

def rotate_objects_x_axis():
    """全オブジェクトをX軸で-90度回転(WRLインポート時の回転を修正)"""

    # まず全てのオブジェクトを表示状態にする
    for obj in bpy.data.objects:
        obj.hide_set(False)
        obj.hide_viewport = False
        obj.hide_select = False

    # 全オブジェクトを選択(Blenderの "A" キー相当)
    bpy.ops.object.select_all(action='SELECT')

    # アクティブオブジェクトを設定(最初のオブジェクトをアクティブに)
    if bpy.data.objects:
        bpy.context.view_layer.objects.active = bpy.data.objects[0]

    # 選択したオブジェクトの数を確認
    selected_count = len(bpy.context.selected_objects)
    print(f"Selected {selected_count} objects for rotation")

    # X軸で-90度回転(Blenderの "R X -90" 相当)
    # WRLインポート時は通常90度回転しているので、-90度で元に戻す
    bpy.ops.transform.rotate(
        value=math.radians(-90),  # -90度をラジアンに変換
        orient_axis='X',           # X軸
        orient_type='GLOBAL'       # グローバル座標系
    )

    print(f"Rotated all {selected_count} objects by -90° on X axis")

    # 回転を適用(オプション:必要に応じてコメントアウト可能)
    # これにより、回転値が実際のメッシュに適用され、rotation_eulerが0にリセットされる
    try:
        bpy.ops.object.transform_apply(location=False, rotation=True, scale=False)
        print("Applied rotation transform to all objects")
    except:
        print("Could not apply transform (some objects may not support it)")

    # デバッグ用:いくつかのオブジェクトの最終回転値を確認
    print("\n=== Rotation check for sample objects ===")
    for i, obj in enumerate(bpy.data.objects[:5]):  # 最初の5個を確認
        print(f"  {obj.name}: X rotation = {math.degrees(obj.rotation_euler[0]):.2f}°")

    # 全オブジェクトを選択状態のままにする(後続の処理のため)

def adjust_materials_alpha():
    """Shape_Color_*マテリアルのアルファを0.5に変更"""
    for material in bpy.data.materials:
        if material.name.startswith("Shape_Color_"):
            # Principled BSDFノードを探す
            if material.use_nodes:
                for node in material.node_tree.nodes:
                    if node.type == 'BSDF_PRINCIPLED':
                        node.inputs['Alpha'].default_value = 0.5
                        # Blend Modeを設定(透明度を有効にする)
                        material.blend_method = 'BLEND'
                        material.show_transparent_back = True
            else:
                # ノードを使用していない場合
                material.diffuse_color[3] = 0.5  # アルファチャンネル

def export_fbx(input_filepath):
    """FBX形式でエクスポート(元のディレクトリとファイル名を保持)"""
    # 入力ファイルのパスを解析
    input_path = Path(input_filepath)
    output_dir = input_path.parent
    output_name = input_path.stem + ".fbx"
    output_path = output_dir / output_name

    try:
        # FBXエクスポート設定
        bpy.ops.export_scene.fbx(
            filepath=str(output_path),
            use_selection=False,
            global_scale=1.0,
            apply_scale_options='FBX_SCALE_NONE',
            axis_forward='-Z',
            axis_up='Y',
            use_mesh_modifiers=True,
            mesh_smooth_type='FACE',
            use_tspace=True
        )
        print(f"Exported FBX to: {output_path}")
        return True
    except Exception as e:
        print(f"Error exporting FBX: {e}")
        return False

def process_single_file(filepath, merge_module):
    """単一のWRLファイルを処理"""
    print(f"\n--- Processing: {filepath} ---")

    # 1. シーンをクリア
    clear_scene()

    # 2. WRLファイルをインポート
    if not import_wrl_file(filepath):
        return False

    # インポート後、全オブジェクトを確認
    print(f"Imported {len(bpy.data.objects)} objects")

    # 3. X軸回転を修正(全オブジェクトに適用)
    rotate_objects_x_axis()

    # 4. merge_similar_colorsを実行
    try:
        merge_module.merge_similar_colors(threshold=0.01)
        print("Applied merge_similar_colors")
    except Exception as e:
        print(f"Error in merge_similar_colors: {e}")

    # 5. マテリアルのアルファを調整
    adjust_materials_alpha()

    # 6. FBXとしてエクスポート
    return export_fbx(filepath)

# ファイル選択用のオペレータークラス
class WRL_OT_batch_converter(bpy.types.Operator):
    """WRL to FBX Batch Converter"""
    bl_idname = "wm.wrl_batch_converter"
    bl_label = "Select WRL Files"
    bl_options = {'REGISTER', 'UNDO'}

    # ファイル選択プロパティ
    files: bpy.props.CollectionProperty(
        type=bpy.types.OperatorFileListElement,
        options={'HIDDEN', 'SKIP_SAVE'}
    )

    directory: bpy.props.StringProperty(
        subtype='DIR_PATH'
    )

    filter_glob: bpy.props.StringProperty(
        default="*.wrl;*.x3d",
        options={'HIDDEN'}
    )

    def execute(self, context):
        # merge_same_color_meshモジュールをインポート
        try:
            merge_module = import_merge_script()
        except Exception as e:
            self.report({'ERROR'}, f"Failed to import merge script: {e}")
            return {'CANCELLED'}

        # 選択されたファイルを処理
        processed = 0
        failed = 0

        for file in self.files:
            filepath = os.path.join(self.directory, file.name)
            if process_single_file(filepath, merge_module):
                processed += 1
            else:
                failed += 1

        # 結果を報告
        self.report({'INFO'}, f"Processed: {processed} files, Failed: {failed} files")
        return {'FINISHED'}

    def invoke(self, context, event):
        context.window_manager.fileselect_add(self)
        return {'RUNNING_MODAL'}

def main():
    """メイン処理:ファイル選択ダイアログを表示してバッチ処理を実行"""

    # オペレーターを登録(既に登録されている場合は一度解除)
    try:
        bpy.utils.unregister_class(WRL_OT_batch_converter)
    except:
        pass  # まだ登録されていない場合はパス

    bpy.utils.register_class(WRL_OT_batch_converter)

    # オペレーターを実行
    bpy.ops.wm.wrl_batch_converter('INVOKE_DEFAULT')

# スクリプト実行
if __name__ == "__main__":
    main()